
REFLEXOLOGY REVISITED · COURSE REVIEW EDITION
← All chapters

Chapter 03 / 12 · 7 lessons

Know the feet

Find your bearings with anatomy, landmarks and thoughtfully explained maps.

Review marks stay on this device.

Lessons

Chapter overview

Section 3 Know the Feet

Anatomy Maps and Foot Zoning

Written teaching draft • September 24 2026

Learn to find your way around a foot, read traditional maps thoughtfully, and describe what you notice without turning it into a diagnosis. This section combines Ruth’s supplied account with researched foundations and proposed teaching activities. First-person scripts below are adaptations for her review, not quotations or evidence of additional qualifications.

Your learning goals

  • Identify the client’s left and right foot, four surfaces, and ten beginner landmarks.
  • Use anatomical vocabulary to describe a location clearly.
  • Distinguish anatomy, traditional reflexology maps, longitudinal zones, and acupuncture point references.
  • Explain which elements Ruth reports using and which are comparative learning only.
  • Support a consenting partner’s foot comfortably and document observations without diagnosing.

Learning route

Lesson Focus Estimated time
1 Find your bearings 6 minutes
2 Meet the landmarks 8 minutes
3 Read a reflexology map 7 minutes
4 Understand zones and foot zoning 6 minutes
5 Compare acupuncture point references 5 minutes
6 Meet Ruth’s approach 7 minutes
7 Observe and describe accurately 6 minutes

Allow another 45–60 minutes for drawing, retrieval practice, partner observation, and assessment. Times include pauses and demonstrations; they are planning estimates, not accredited hours. Prerequisite: Section 2 consent and safety. Supplies: printed workbook, pencil, towel, foot model or your own foot; an optional consenting adult partner.

Start with curiosity: If someone says “the inside of my foot,” can you find that area when you are sitting opposite them? By the end, you will be able to describe it so another learner can find it too.
Lessons

Lesson 1 · Find your bearings

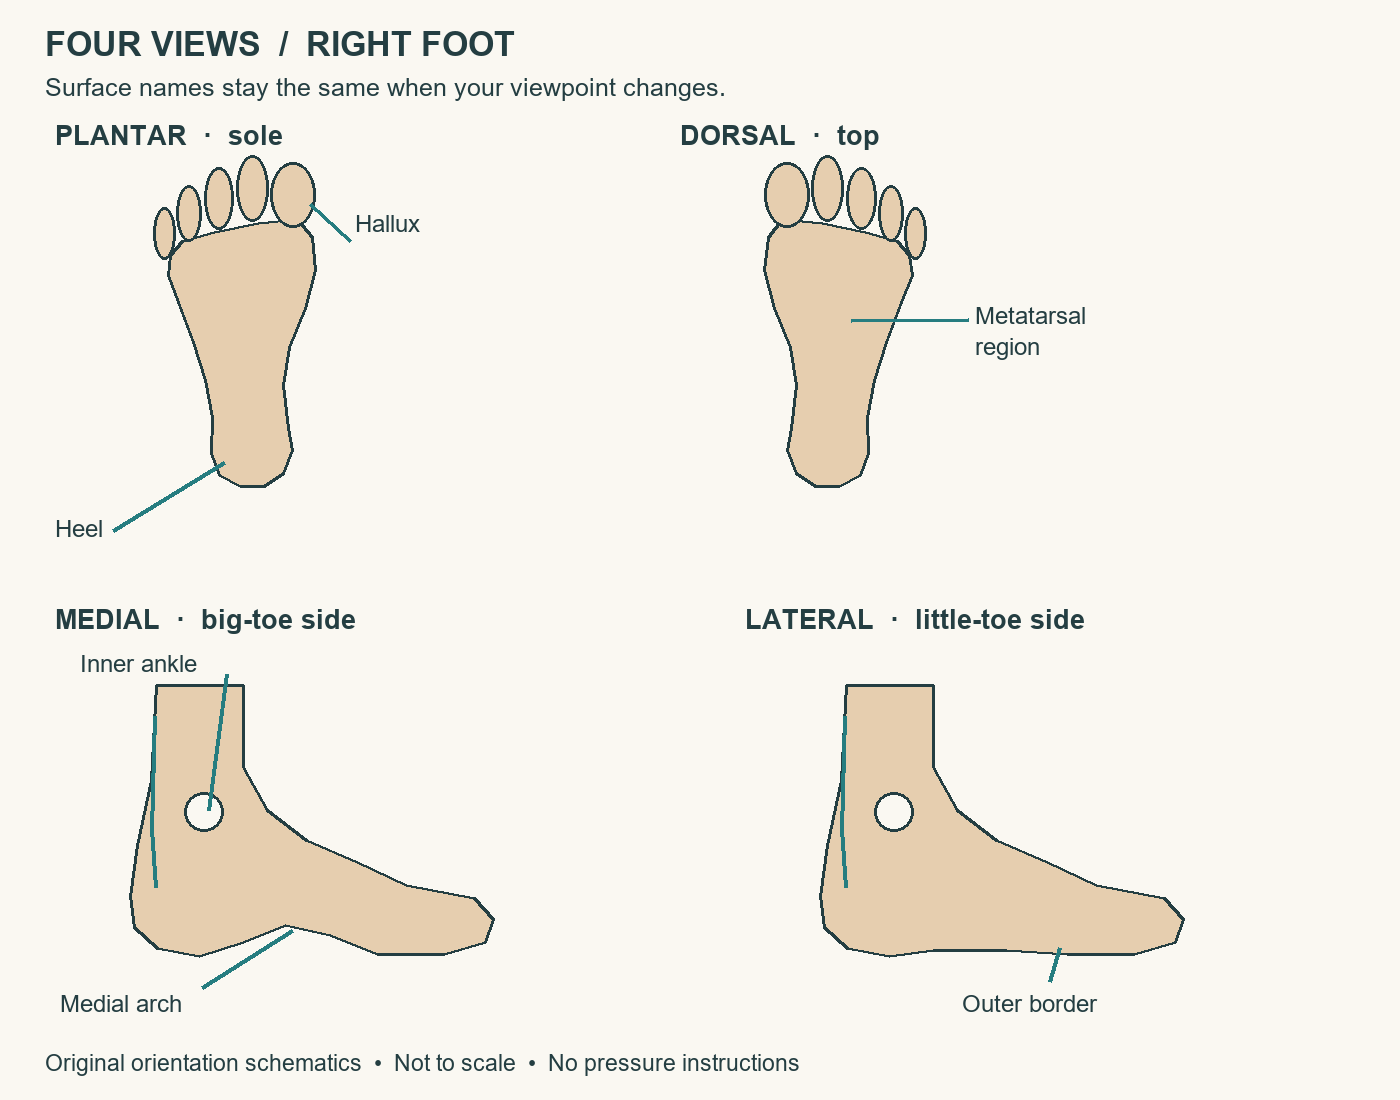
Outcome: Name the foot and surface before naming a point. Use Visual 1 and Workbook 1.

Spoken script

“Before we reach for a chart, let’s meet the foot in front of us. We start with the person’s left and right. When you sit facing someone, their right foot can be on your left. Your chair position doesn’t rename their foot.

“The sole is the plantar surface. The top is the dorsal surface. The edge on the big-toe side is medial: toward the body’s midline. The little-toe side is lateral: away from the midline. Those names stay the same when the foot turns.

“The big toe is also called the hallux, or digit one. Count outward to the little toe, digit five. We count that way on both feet. The second toe can be longer than the big toe; size isn’t how we assign its number.

“Now imagine giving someone directions. ‘On the right foot, on the plantar surface, just behind the big-toe pad’ is more useful than ‘over here.’ We can become more precise as we learn the landmarks.

“Proximal means nearer the limb’s attachment to the body; distal means farther away. Along the foot, toward the ankle is proximal and toward the toes is distal. We’ll also use anterior for toward the front of the body and posterior for toward the back. For a beginner describing the foot, surface names are often the clearest starting point.

“You don’t need to remember all the words immediately. Find the big toe. Find the sole. Say the name out loud. Then turn the foot and do it again.”

Demonstration and learner pause

Film the same right foot from above, below, and each side. Keep a physical RIGHT card in frame. First point silently, then reveal the surface label. Do not mirror footage. Ask learners to predict the next label before it appears.

Thirty-second challenge: With a model, identify plantar, dorsal, medial, and lateral without turning the model back to its starting position. Repeat on the other foot. No partner contact is needed.

Quick check

The client’s right foot is on your left. Its big-toe edge is still medial. The fourth toe is digit four, counted from the big toe. Orientation vocabulary is anatomical; it does not depend on a reflexology chart. [1]

Practice & reference

Visual 1 Four views of one foot

Four schematic views of a right foot with surface and landmark labels

Read the view label first. These are original simplified orientation drawings of the right foot. Toe proportions and contours vary between people. They are not diagnostic illustrations or pressure guides.

Find it before you read it

Cover the labels with paper. Point to the sole, top, big-toe edge, little-toe edge, heel, and inner ankle. Explain why the big toe appears on a different side in the top and sole views.

Answer: You are viewing opposite surfaces of the same foot. The client’s side and the anatomical names have not changed.

Lessons

Lesson 2 · Meet the landmarks

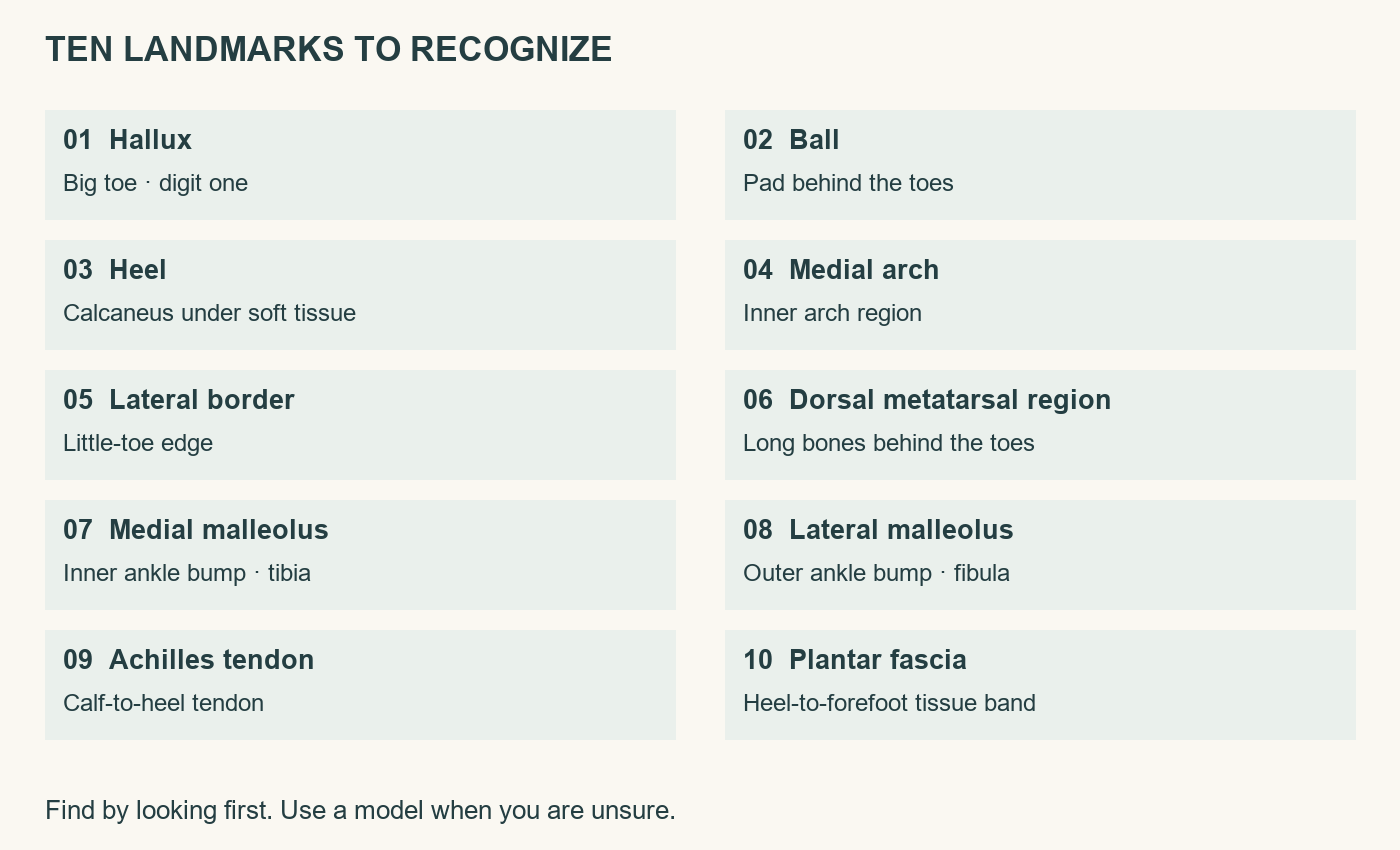
Outcome: Locate ten beginner landmarks by looking or using comfortable, light contact. Sources: [1–3].

Spoken script

“A landmark gives us a shared reference. Start with the heel, the ball, and the toes. The heel’s bony foundation is the calcaneus, covered by soft tissue. The ball is the padded area near the heads of the metatarsal bones, just behind the toes. The arch is a shape supported by several structures; it is not one bone.

“The toe bones are phalanges. The five longer bones behind the toes are metatarsals. There are seven tarsal bones farther back in the foot, including the talus and calcaneus. The standard count is 26 bones: seven tarsals, five metatarsals, and fourteen phalanges. You don’t need to locate every bone to begin this section.

“At the ankle, the inner bump is the medial malleolus, part of the tibia. The outer bump is the lateral malleolus, part of the fibula. They are not the heel bone. Behind the ankle, the Achilles tendon connects the calf muscles to the heel bone. Notice where it is; don’t squeeze it to test your knowledge.

“Underneath, the plantar fascia is a strong band of connective tissue running from the heel toward the front of the foot. Naming that structure doesn’t mean we can diagnose it by pressing on a tender spot.

“I often work along the inner edge. Anatomically, describe it as the medial border or medial arch region. A traditional chart may call part of this the spine reflex. Keep both names available, and know which kind of statement you’re making.”

Guided landmark circuit

  1. Identify hallux and digits two through five. 2. Locate the ball. 3. Locate the heel. 4. Follow the medial arch visually. 5. Identify the lateral border. 6. Point to the dorsal metatarsal region. 7. Identify the medial malleolus. 8. Identify the lateral malleolus. 9. Point to the Achilles tendon. 10. Describe the plantar fascia’s general course on a diagram.

Use a model for any structure that is unclear. Avoid pressing deeply to “find” it. A diagram, visible contour, and a client’s comfort matter more than forcing a match.

Anticipated beginner mix-ups

These are teaching predictions, not errors Ruth says she has observed: reversing left and right; confusing medial with the viewer’s left; calling the ball the arch; confusing an ankle bump with the heel; treating a chart label as a physical structure. Correct with a view change and a second attempt.

Practice & reference

Visual 2 Landmark reference card

Ten landmarks organized by region and type

Vocabulary to keep close

Joint: where bones meet. Tendon: connects muscle to bone. Ligament: connects bone to bone. Fascia: connective tissue that supports and connects structures. Palpation: examining by touch; in this course, light landmark recognition is not a clinical examination.

Movement vocabulary for recognition: Dorsiflexion brings the top of the foot toward the shin; plantarflexion points it away. Inversion turns the sole inward; eversion turns it outward. Learn the words on a model. This lesson does not ask students to move a partner through an ankle range or test a joint. [1,3]

Memory pause: Say one structure that belongs to the foot and one ankle prominence that belongs to a lower-leg bone. Answer: calcaneus; medial malleolus of the tibia.

Lessons

Lesson 3 · Read a reflexology map

Outcome: Explain the difference between a physical landmark and a traditional correspondence. Use Visual 3 and Workbook 2.

Spoken script

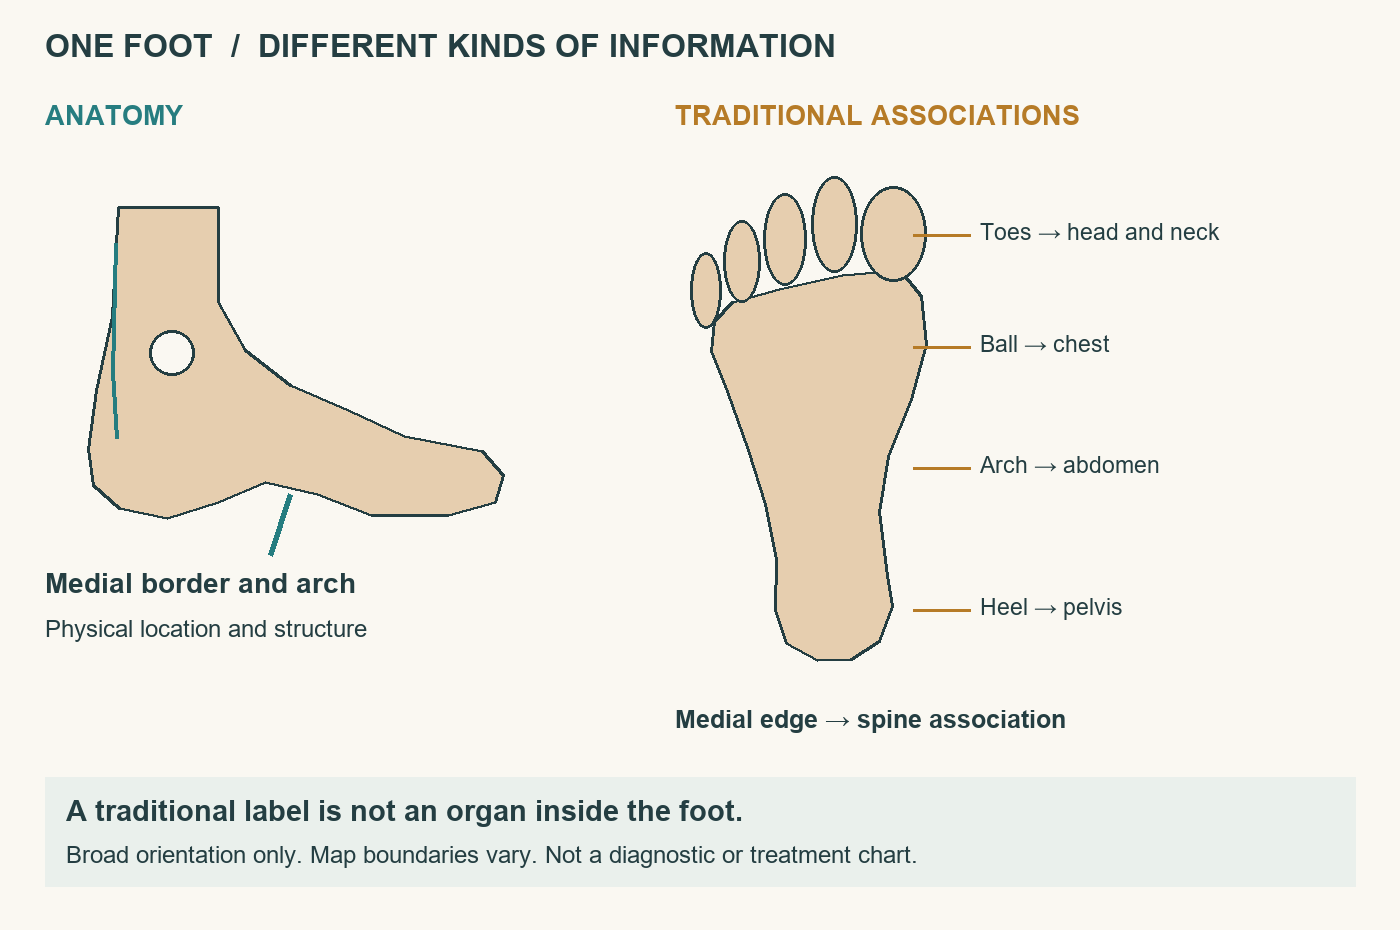
“A foot chart adds a traditional set of associations to a drawing of the foot. When a chart labels a region ‘spine,’ it isn’t showing vertebrae inside the foot. It is showing an association used within that reflexology system.

“I don’t actively consult charts during my sessions. I do often work along the inner edge that many maps associate with the spine. I also want you to understand charts because they are part of the language people bring to reflexology.

“A useful chart lets you see the sole, the top, and both sides. Before you follow a label, check which foot it shows, which surface you are looking at, and who made it. Different maps may place boundaries or labels differently. There is no single unnamed ‘standard chart’ that makes those differences disappear.

“For this lesson, we use a broad orientation sketch. In many Western maps, toes are associated with head and neck areas, the ball with chest areas, the arch with abdominal areas, and the heel with pelvic areas. Those are broad traditional associations. They do not establish an organ connection or tell us what is wrong with someone.

“Someone may tell you they felt something elsewhere in their body while you touched a foot. Listen without supplying an explanation they didn’t give. You can say, ‘Thank you for telling me. What did you notice, and would you like me to change anything?’ A personal experience matters without becoming proof that a chart is medically accurate.”

Map-reading routine

  • Identify title, creator, edition or access date, and whether it is anatomy or a traditional map.
  • Check left or right, surface, toe direction, and legend.
  • Locate a physical landmark first; then read the traditional label.
  • State “this map associates…” rather than “this area controls…”.
  • Record uncertainty or disagreement between maps instead of combining them silently.

Activity: Open the Association of Reflexologists Foot Reflexology Explorer [4]. Choose two available views and locate the medial border. Compare its labels with our broad schematic. Write one similarity and one difference. If internet access is unavailable, use Visual 3 and explain its limitations.

Evidence note: NCCIH states that reflexology’s claimed effects in corresponding body areas have not been proven. A map is not a diagnostic test. [5]

Practice & reference

Visual 3 The foot and the map

Anatomical medial border alongside broad traditional reflexology associations

Original teaching schematic. Broad associations only; individual charts vary. This is not an exact reproduction of Ruth’s charts, which have not been identified. It does not show treatment points or organ anatomy within the foot. Sources for comparison: [4,6].

Three sentences to practice

Anatomy: “This is the medial border of the right foot.”

Tradition: “Many reflexology maps associate this region with the spine.”

Experience: “The client reported a sensation in their back during contact.”

These sentences describe different things. None establishes a spinal diagnosis or proves that touching the foot changed the spine.

Lessons

Lesson 4 · Understand zones and foot zoning

Outcome: Explain five zones per foot and distinguish a model from a named practice system.

Spoken script

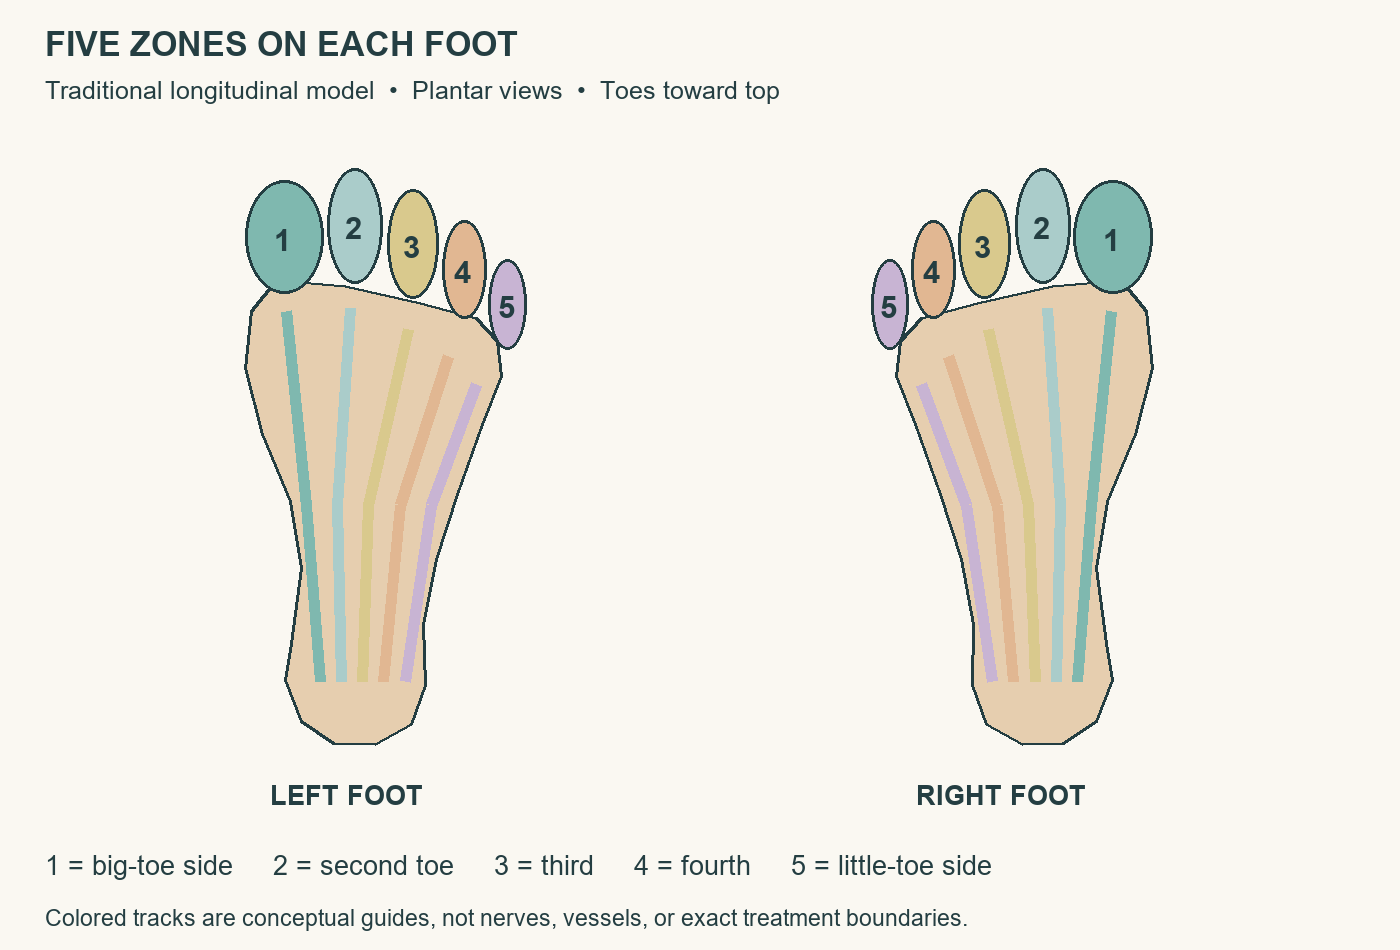
“The five-zone idea you asked about is a useful piece of historical context. In the traditional longitudinal model, the body is imagined as ten lengthwise zones: five on each side. On each foot, zone one aligns with the big toe and zone five with the little toe. We number outward from the medial side. We don’t continue from six to ten on the other foot.

“These are conceptual bands. They aren’t five visible channels, five arteries, or five nerves. The model does not establish that one toe controls every organ somewhere above it.

“Western zone therapy is associated with William Fitzgerald in the early twentieth century. Eunice Ingham later developed and popularized foot-focused reflexology. The terms have overlapping histories, and schools sometimes use them differently. That is why we name the source rather than assuming every use of ‘zone’ means the same thing.

“Today, a named foot-zoning system can include its own sequence, terminology, theory, and training. One example is FootZonology, whose provider describes its own methods. Knowing that a system exists doesn’t mean we have learned its protocol or established its claims.

“I have not described training in foot zoning. My own toe sequence developed in my practice; I am not presenting it as a named foot-zoning method. In this section, we learn the zone model comparatively. You are not being certified in another school’s system.”

Compare the approaches

Approach What it organizes Place in this course
Anatomical orientation Physical structures and directions Required foundation
Reflexology maps Traditional body-area associations Map literacy and context
Longitudinal zone therapy Ten conceptual bands across the body Comparative introduction
Named foot-zoning systems School-specific methods and sequences Awareness only
Ruth’s personal sequence Her reported contact pattern Observation and later confirmation

Pause: Trace five imaginary bands on paper, starting with the big toe. Say: “This is a traditional model.” Do not press a partner’s foot to test it. Historical and model references: [6,7]. Provider example, not clinical evidence: [8].

Practice & reference

Visual 4 Five zones on each foot

Paired plantar foot schematics numbered one to five from big toe outward

Traditional model only. The colored bands and dividing lines are schematic. They represent neither anatomical pathways nor precise treatment boundaries. A named method may use additional subdivisions.

Retrieval game

Cover the numbers. On each foot, mark zone one first and zone five second. Then fill the middle three. Turn the page upside down and point to zone one again. Changing the page’s orientation should not change your answer.

Answer: Zone one follows the big-toe side on both feet; zone five follows the little-toe side. Five per foot, ten across the two sides in the traditional model. [7]

Lessons

Lesson 5 · Compare acupuncture point references

Outcome: Recognize a different mapping tradition without treating it as interchangeable with reflexology.

Spoken script

“An acupuncture chart uses named points, often identified by a channel abbreviation and a number. Acupressure may use manual contact at points from these traditions; acupuncture commonly uses needles. The shared vocabulary doesn’t make the practices identical.

“A reflexology label such as ‘kidney reflex’ is not the same as a Kidney-channel acupuncture point. A channel name also isn’t a diagnosis about that organ. Do not combine these maps into one chart that implies they are equivalent.

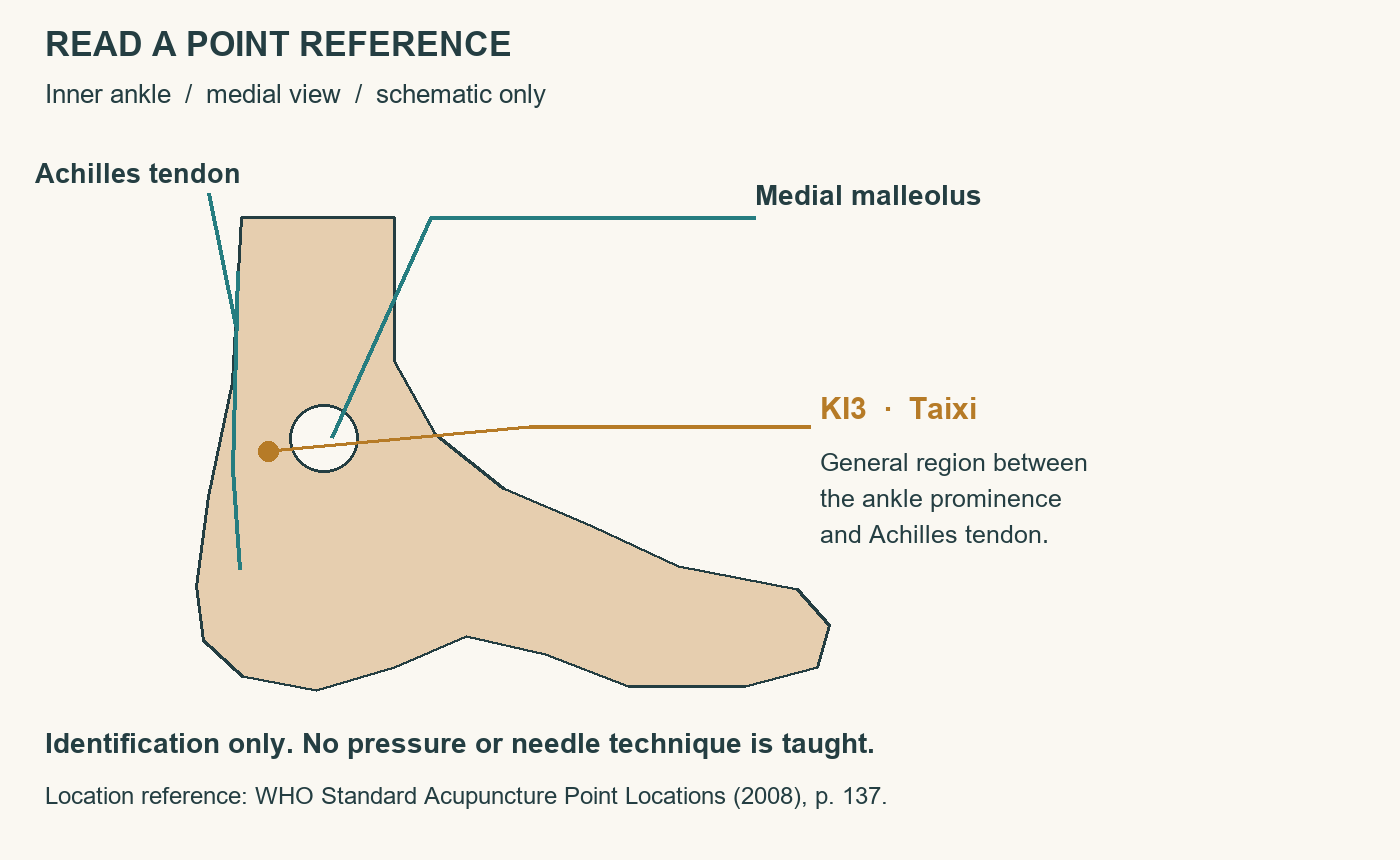
“We will look at one point as an example of how to read a reference. The World Health Organization location reference calls KI3 ‘Taixi’ and locates it at the inner back part of the ankle, in the hollow between the inner ankle prominence and the Achilles tendon. Notice how that description relies on landmarks we just learned.

“Our purpose is to recognize the language and reference system. We are not selecting a point to treat a symptom, applying targeted pressure, or teaching needles. A chart cannot substitute for training in the technique it represents.”

Visual reference exercise

Inner ankle reference with KI3 shown between medial malleolus and Achilles tendon

Schematic identification example only. Dot indicates a general region, not individualized clinical localization. KI3 is the code; Taixi is the point name; the location reference is WHO, WHO Standard Acupuncture Point Locations in the Western Pacific Region (2008), printed page 137. Standardized location does not prove therapeutic effectiveness. [9,10]

Check: Does knowing a point’s location qualify you to use it clinically? No. Does a Kidney-channel label show kidney disease? No. Additional point charts belong in a separately reviewed reference set, not an improvised symptom-treatment lesson.

Lessons

Lesson 6 · Meet Ruth’s approach

Outcome: Describe Ruth’s reported practice accurately while respecting client choice.

Spoken script

“I like students to feel confident holding a foot. That means I take responsibility for supporting it, explaining what I am about to do, and checking comfort. The person should not have to keep their leg lifted for me. They can still choose to help position it, ask for a different support, or decline the contact.

“I might say, ‘May I support your heel and help position your foot? You can let it rest if that feels comfortable.’ I wait for the answer. If the person pulls away, I pause. Confidence includes noticing when to change course.

“I often work along the inner edge associated with the spine on traditional maps, and around the ankle. In this course we describe that as an area of contact and comfort. We don’t promise that ankle work improves circulation or use it as a treatment for swelling or vascular problems.

“I also have a personal sequence in which I describe moving from the base of the foot toward each toe, starting with the big toe. I then describe light contact at each toe, moving toward the little toe, followed by slow holding back toward the big toe, with both hands working across both feet.

“Some clients describe unusual sensations or experiences they call energetic. We can respect those descriptions without telling them what must be happening inside their body. Feeling nothing unusual is also a valid experience.”

Observation sequence for filming

Show the reported order as three cards: base toward toes → big toe toward little toe → slow holds back toward big toe. Do not animate pressure, joint traction, or invisible energy flow. Caption: “Ruth’s personal sequence as verbally described; not a named foot-zoning protocol.”

Important teaching distinction: “Base,” “top,” exact hand placement, pressure, speed, and duration are not sufficiently specified in the account to create a reproducible technique lesson. Film Ruth demonstrating and clarifying them before adding hands-on replication. For now, students describe the order on paper only. Do not invent missing technique parameters.

Supported holding practice

After Section 2 screening, offer a model or optional consenting adult. With the foot resting on a comfortable support, ask permission to place a broad hand under the heel without lifting or moving the ankle. Ask about comfort, then release. No pinching, toe pulling, pressure-point work, or range testing in this practice. Stop for pain, withdrawal, or uncertainty.

Lessons

Lesson 7 · Observe and describe accurately

Outcome: Separate location, observable features, client report, and interpretation.

Spoken script

“When we notice something, our minds often rush to explain it. Slow that step down. Start with where: left or right foot, surface, and landmark. Then say what you can actually observe.

“‘A small area of skin looks pink at the medial heel’ is an observation. ‘The client says that area feels tender’ is a report. ‘This shows a problem in the lower back’ is a diagnostic interpretation we cannot make from the chart.

“Ask a neutral question: ‘What are you noticing?’ Avoid planting a sensation by saying, ‘You can feel that in your liver, can’t you?’ If someone uses the word energy, you can preserve their words: ‘Client described a wave of energy in the chest.’ That records their experience without claiming a measured energy change.

“A new symptom deserves attention on its own terms. Pain is not proof that a reflex needs harder pressure, and distress is not evidence that a release is working. Pause, check, and follow the safety decisions you learned in Section 2.”

Worked example

Scenario: During permitted light contact at the medial arch, the client withdraws their foot and says, “That’s sharp.”

Record: “Right foot, medial arch region. Client withdrew foot and reported sharp pain during light contact. Contact stopped. Area avoided; client advised to seek appropriate assessment for persistent or unexplained symptoms.”

Do not record: “Blocked spine reflex released.” No chart-based mechanism has been established.

Three quick scenarios

  • “That felt warm in my back.” Acknowledge the report; ask whether they want contact changed. Do not confirm a spinal effect.
  • “I can’t feel your hand well.” Stop the practice and follow Section 2 guidance for altered sensation; do not increase pressure to produce a response.
  • “One ankle became swollen, red, and painful today.” Do not proceed with practice; prompt medical assessment is appropriate. Chest pain or difficulty breathing calls for emergency help. Do not label this an energetic reaction. [11]

Exit phrase: “I can describe what I notice, listen to what you report, and stay honest about what I do not know.”

Practice & reference

Workbook 1 Find and name

Name __________________________ Date __________________________

Work from a model or your own foot. Label the four views in Visual 1 before checking its answers. Then complete the prompts below without looking back at Lesson 1.

Prompt Your answer
Anatomical name for the sole
Anatomical name for the top
Big-toe edge
Little-toe edge
Other name for the big toe
Toward the ankle along the foot
Toward the toes along the foot

Landmark scavenger hunt

Point to each item on a model or drawing. Mark found, need another look, or need help. Recognition can be visual; you do not need to press your body to complete it.

Heel ____ Ball ____ Hallux ____ Medial arch ____ Lateral border ____

Dorsal metatarsal region ____ Medial malleolus ____ Lateral malleolus ____

Achilles tendon ____ General plantar fascia course ____

Describe a location

Write directions to one landmark without pointing. Include the client’s side, surface, and a nearby reference. Ask a partner to locate it on a model from your words alone.


Reflection: Which word helped most? What did you need to clarify?


Practice & reference

Workbook 2 Read and compare maps

Use Visuals 3–5 and, if available, the linked AoR map. This is a comparison exercise, not a treatment plan.

Question Your notes
Title and creator of the reference
Edition or access date
Client’s left or right foot and view
Anatomy traditional map or point reference
One physical landmark used for orientation
One traditional label and how it differs from anatomy

Five zones from memory

Draw two simple foot outlines below. Label each as LEFT or RIGHT and specify PLANTAR VIEW. Number zones one through five on each, beginning with the big-toe side. Include the caption “Traditional model, not anatomical pathways.”


Explain the difference

How does a traditional spine reflex differ from the medial border of the foot?


Why is KI3 different from a “kidney reflex” label on a reflexology map?


Map disagreement: If two charts disagree, record which two charts and what differs. Do not invent a combined location. For this course, the exact final Ruth-selected map remains to be identified.

Practice & reference

Workbook 3 Notice without diagnosing

Rewrite each sentence as a location, observation or client report, followed by an appropriate response.

1. “Your spine is blocked because the inside of your foot hurts.”


2. “That warmth proves energy moved into your stomach.”


3. “Relax and let me move your foot however I need.”


Optional partner observation

Complete Section 2 screening and consent first. A foot model is an equally valid option. Practice only observation and supported holding as described in Lesson 6.

Consent words and response: ______________________________________

Client’s side surface and landmark: _________________________________

What I observed: __________________________________________________

Client’s exact words if any: _________________________________________

What I changed or stopped: _________________________________________

What remains unknown: ____________________________________________

After practice, ask: “Did you feel you could ask me to change or stop?” Record feedback without defensiveness. Use initials or an invented case name rather than unnecessary identifying details.

Practice & reference

Learning check

Complete without the lesson pages. Proposed local standard: eight of ten correct, plus all practical safety criteria. This is a course-development recommendation, not an external credential requirement.

  1. You face a client. Their right foot is on your left. Which foot do you document?

  2. Name the plantar and dorsal surfaces in everyday language.

  3. Which toe is digit one? Which edge of the foot is lateral?

  4. Match the structures: calcaneus, medial malleolus, Achilles tendon. Choices: heel bone; inner tibial ankle prominence; calf-to-heel tendon.

  5. Explain the difference between the medial border and the traditional spine reflex.

  6. How many longitudinal zones are conventionally shown per foot? Where is zone one?

  7. Does Ruth’s supplied account establish training in a named foot-zoning system? Explain how her toe sequence should be labeled.

  8. Is KI3 the same as the kidney reflex on a reflexology chart? What does a standardized point location establish?

  9. A client says, “I felt that in my shoulder.” Give one neutral response and one accurate record entry.

  10. A partner withdraws their foot and reports pain. What do you do first? Can a chart justify continuing?

Practical demonstration

In three minutes, orient a model and identify four surfaces plus six instructor-selected landmarks. Then, with a model or screened consenting adult, explain supported holding and demonstrate responding to “stop.” Finally, describe one anatomical location, one traditional map association, and one client report without confusing them.

Retrieval after a break: Repeat the four-surface task tomorrow without rereading. A second accurate attempt is more useful than simply feeling familiar with the page.

Practice & reference

Answers and feedback guide

  1. Right foot. Client orientation takes priority over the viewer’s position.

  2. Plantar is the sole; dorsal is the top.

  3. The hallux or big toe is digit one. The little-toe edge is lateral.

  4. Calcaneus: heel bone. Medial malleolus: inner ankle prominence of the tibia. Achilles tendon: calf-to-heel tendon.

  5. Medial border is an anatomical location. Spine reflex is a traditional association on certain maps, not vertebrae or a proven diagnostic relationship.

  6. Five per foot; zone one aligns with the big-toe side. The traditional model describes ten across both sides.

  7. No. Call it Ruth’s personal sequence, based on her verbal account. Do not attribute formal foot-zoning training or a named protocol to her.

  8. No. KI3 belongs to an acupuncture point naming system. Standardization supplies a common reference for location; it does not establish a diagnosis or treatment efficacy.

  9. Example: “What did you notice, and would you like anything changed?” Record: “Client reported a sensation in the shoulder during foot contact.” Add side and contact location only if known.

  10. Stop contact first, check comfort, and apply Section 2 guidance. A map never overrides pain or withdrawal of consent.

Workbook answer notes

Workbook 1: plantar, dorsal, medial, lateral, hallux, proximal, distal. Accept a landmark description another learner can follow accurately.

Workbook 2: assess source identification, orientation, and separation of tradition from anatomy. Zone numbers run from big toe outward on both feet. No medical-effect claim is required or accepted.

Workbook 3 examples: “Client reports tenderness at the medial arch; contact stopped.” “Client reports warmth in the abdomen; mechanism unknown.” “May I support your foot? Please tell me if you want a change or a stop.” Do not add a side, symptom, or action not supplied in the actual case.

Practical rubric

Criterion Ready means Score
Orientation Names client side and all four surfaces correctly 0–2
Landmarks Finds six selected landmarks without force 0–2
Map literacy Separates anatomy tradition and report 0–2
Consent and support Asks waits supports and stops promptly 0–2
Documentation Records facts without diagnostic inference 0–2

Score 0 = not demonstrated; 1 = prompted or partly correct; 2 = independent. Proposed pass: 8/10, with consent/support and map literacy each scoring 2. Painful contact, ignoring “stop,” or chart-based diagnosis requires reteaching before progression. Offer diagram-based alternatives for access needs.

Production & sources

Instructor filming and engagement plan

Prepare the set

Use a clean neutral background, soft even lighting, and a consenting adult model with separate filming permission. Keep foot support visible. Avoid identifiable client stories. Have physical LEFT and RIGHT cards, a towel, the original diagrams, and a pencil. Frame anatomy accurately; do not mirror footage in editing.

Scene Show Learner action
Orientation Same foot in four views Predict each surface before reveal
Landmarks Heel ball arch and ankle close-ups Point on own diagram
Map reading Anatomy and traditional overlay separately Classify three statements
Zones Two feet numbered outward Cover and reconstruct numbers
Point reference KI3 diagram and WHO reference Name its two landmark boundaries
Ruth’s approach Supported hold and verbal sequence cards Separate confirmed order from missing detail
Observation Partner says stop State first response and write a note

Use a brief retrieval pause every two or three minutes. Let learners answer before the caption appears. Keep music low or absent during terminology. Caption spoken vocabulary and provide the script as a transcript. Do not rely on color alone: every region needs a text label.

Short facilitator prompts

“Show me medial without moving your chair.” “Which statement is anatomy?” “What did the person actually say?” “Which part came from the chart?” “What would make you stop?”

Praise precise descriptions and responsive changes rather than a dramatic reaction from the receiver. No sensation, uncertainty, and opting out are valid outcomes.

Before filming the personal sequence

Ask Ruth to demonstrate what she means by base and top, how each hand supports each foot, and how she adapts when contact is uncomfortable. Capture her natural explanation first. The current lesson is complete as an observation lesson; a replicable pressure or movement protocol requires that additional source material.

Production & sources

Chart and illustration production brief

What is provided now

Five original schematic teaching visuals accompany this draft: four-view orientation, landmark reference card, anatomy versus map associations, paired five-zone model, and one acupuncture point reference. PNG files are embedded in the Word document; editable SVG companions are supplied for the illustrator. They are educational schematics, not reproductions of a commercial chart or final clinical atlases.

What Ruth has and has not identified

Ruth prefers sole, top, and side views, plus acupuncture/acupressure references and a zone chart. She has not supplied titles, editions, creators, or images of her exact charts. Do not label the research references below “Ruth’s charts” or invent a training source.

Directions for the illustrator

  • Produce separate plates for anatomy, traditional reflexology, zones, and acupuncture references. Keep their legends distinct.
  • Label client side and view on every plate. Check toe count and medial/lateral orientation in each view, including exports and video overlays.
  • Preserve readable labels at workbook size; use leader lines that terminate at the intended feature. Offer numbered versions for quizzes and text alternatives.
  • Develop original compositions from verified facts. Do not trace or stylistically restyle an unidentified chart and assume that resolves rights.
  • For exact reflexology maps, record title, edition, creator, source, and permission terms before adaptation. Include commercial course, print, download, video, translation, and modification uses as applicable.
  • For each final plate, keep an anatomy or appropriately qualified subject reviewer’s dated corrections. Aesthetic approval alone does not verify labels.

Rights note: The U.S. Copyright Office explains that the right to create derivative versions generally belongs to the copyright owner. Giving an existing chart a new visual style does not by itself establish permission. Linking to a reference is different from reproducing its artwork. [12]

Asset record template

Title __________ Creator __________ Edition/date __________ Source __________

Rights holder __________ License or written permission file __________

Allowed uses and required credit ________________________________________

Content reviewer __________ Review date __________ Version __________

Release status: Written course draft and original schematic assets prepared. Ruth’s editorial adoption, exact map selection, any third-party reproduction permission, final illustration review, and filming remain pending. This section is C03 in the September 24 blueprint, not the archived Module 3 on the nervous system.

Production & sources

Sources and evidence notes

Research checked September 24 2026. Numbers refer to sources used in the lessons. Teaching exercises, learner challenges, scripts, and rubrics are proposed course design. Provider descriptions document what a tradition or school says; they are not independent proof of therapeutic effects.

1. OpenStax Anatomy and Physiology, section 8.4 Bones of the Lower Limb. Foot bones, arches, and anatomical foundations. Factual reference; no artwork copied.

OpenStax lower limb anatomy

2. American Academy of Orthopaedic Surgeons, Ankle Fractures. Tibia, fibula, talus, and malleolar landmarks.

AAOS ankle anatomy

3. OpenStax Anatomy and Physiology 2e, section 9.6 Anatomy of Selected Synovial Joints; AAOS Plantar Fasciitis and Bone Spurs. Ankle movement and plantar fascia reference.

OpenStax ankle and joint anatomy

AAOS plantar fascia

4. Association of Reflexologists, Foot Reflexology Explorer. Suggested external chart-literacy reference. Exact edition not stated on the accessed page. Not identified as Ruth’s map; artwork not reproduced.

AoR Foot Reflexology Explorer

5. National Center for Complementary and Integrative Health, Reflexology. Evidence boundary for claimed correspondence effects. Does not support diagnosis from tenderness or an organ-treatment promise.

NCCIH reflexology evidence

6. Association of Reflexologists, Introduction to Reflexology. Profession’s account of Fitzgerald, Ingham, and map theory. Used for traditional context, not adoption of every historical or therapeutic claim on the page.

AoR history and theory

Production & sources

Sources and adoption notes

7. Ayurvedic Reflexology, Reflexology Fundamentals A4, file version 2017.02.01. Practitioner teaching resource illustrating five longitudinal zones on each side. Used only to verify conventional numbering and traditional model; not evidence for energy or organ claims. No diagram copied.

Reflexology Fundamentals zone model

8. Nordblom American Institute of FootZonology, Zonology. First-party example of a named system. Its claims about DNA or biological repair are not adopted or taught as established facts here.

FootZonology provider description

9. World Health Organization, WHO Standard Acupuncture Point Locations in the Western Pacific Region, 2008. ISBN 9789290613831; KI3 location on printed page 137. Location reference only; source artwork not reproduced.

WHO point location reference

10. NCCIH, Acupuncture Effectiveness and Safety. Definition and distinction from a foot-reflexology lesson; no needle technique taught.

NCCIH acupuncture overview

11. NHS, Deep vein thrombosis. Source for prompt assessment of concerning leg symptoms and emergency escalation when associated with chest pain or breathlessness. This course does not diagnose DVT.

NHS DVT symptoms and action

12. U.S. Copyright Office, Copyright in Derivative Works and Compilations and Fair Use FAQ. Basis for maintaining an asset permission record; specific rights decisions depend on the actual source and intended use.

Copyright Office derivative works

Copyright Office permissions FAQ

Ruth supplied the practice context

The September 24 user message establishes her chart preferences, limited familiarity with foot zoning, personal toe sequence, medial-edge emphasis, ankle-area interest, and client reports she describes as energetic. It does not establish named-method training, exact chart ownership, validated physiological effects, or commonly observed student errors. Selected direct extracts and editorial decisions are preserved in the companion source note.

A note for this section

Review workspace

Where your comments live

Connect to the website to share notes with each other. On a static host, use this browser and export your comments to share them.

The access code is in the separate upload guide. Everyone with it can read, edit and resolve review notes.


Device comments are kept in this browser, not sent to anyone. Export a backup before clearing browser data or switching devices.