
REFLEXOLOGY REVISITED · COURSE REVIEW EDITION
← All chapters

Chapter 06 / 12 · 8 lessons

Core contact & technique

Look closely at support, contact, movement and the decisions behind them.

Review marks stay on this device.

Lessons

Chapter overview

Reflexology with Ruth Section 6

Written teaching package • September 24 2026

Learn to begin contact, support a foot, communicate about pressure, move between one foot and both feet, and bring a session to a considerate close. Ruth’s full-session recordings are the main demonstration. This workbook helps you notice the decisions within that continuous flow and practice them in manageable pieces.

The aim is responsive, comfortable contact. Finishing a sequence is less important than responding when a person wants a change.

Who this is for: Adult beginners who have completed the earlier consent, safety, foot orientation, and preparation sections. Use a foot model for rehearsal before partner work. This section is not a clinical assessment, joint-mobilization course, medical treatment protocol, or authorization to practice professionally.

What comes from Ruth: Her opening calf and inner-shin work; finger contact around the ankle; heel support and ankle rotations; smoothing along the foot; flexible combinations of individual-foot and both-feet work; and her preference for reviewing the beginning and ending of student sessions.

What this package adds: Descriptive technique labels, conservative practice instructions, proposed narration, lesson timings, visual learning cards, sample schedules, and assessment tools. These are teaching proposals, not a claim that Ruth has approved an exact grip or sequence. Her detailed finger movements and closing sequence were not supplied. The relevant cards therefore distinguish a beginner exercise from details to confirm in her footage.

Use with video: Watch once for the whole experience. Watch again with one observation task. Rehearse that task, then return to the full session. All narration below is proposed wording for Ruth to adapt, not a verbatim transcript.
Lessons

Your learning route

By the end, you should be able to make contact with consent, maintain support during a transition, ask a useful pressure question, stop or adapt promptly, explain a flexible session plan, and submit footage that can be meaningfully reviewed.

Lesson Focus Guided time
1 Watch the session and identify the building blocks 8 minutes
2 Begin with support and comfortable contact 12 minutes
3 Observe ankle contact and supported movement 12 minutes
4 Smooth and communicate about pressure 10 minutes
5 Move between both feet and one foot 12 minutes
6 Shape a shorter or longer session 12 minutes
7 Finish with care and review your footage 10 minutes
8 Use optional maps thoughtfully 9 minutes

Suggested workload: 85 guided minutes, 40 minutes of separate practice, and 25 minutes for reflection and submission preparation: approximately 2½ hours. These are planning estimates, not accredited training hours. Watching an entire 60-minute reference session is additional if it is not already included in the course viewing schedule.

Supplies: Stable seat, supported practice surface, clean towel, foot model or consenting adult partner, clean hands, short smooth nails, notebook, and a securely placed recording device. No red-light device or organ chart is required.

Practice route: Model rehearsal → consent conversation → one comfortable skill → feedback → opening and ending clips. Partner practice can be replaced with model-based demonstration and spoken decision-making; Ruth must then arrange supported practice before assessing real-person contact competency.

Your first viewing challenge: Find a moment when Ruth changes her hand arrangement. Notice what supports the foot, what moves next, and whether the person is invited to respond.

Practice & reference

Before contact

Use the screening and consent process from Section 2. Ask permission for the lower leg separately from the feet. Explain that movement is optional and that the person may request still contact or no touch.

Suggested opening: “May I begin with your feet? Is there anywhere you would like me to avoid? I may also work gently on the lower leg if that is comfortable for you. You can ask for less pressure, a different position, a pause, or a stop at any time.”

For this beginner module, defer partner practice over broken or infected skin, recent injury, unexplained swelling or pain, or where sensation is reduced and pressure feedback is unreliable. Recent procedures, known circulation problems, fragile bones, and other medical complexity need appropriate individual guidance. A person’s willingness does not remove a safety concern. [2]

Calf warning: New pain and swelling in one leg, warmth, or skin-color change may indicate a blood clot. Do not massage, rotate, or test the leg; seek urgent medical assessment. Chest pain or breathlessness with suspected clot symptoms requires emergency help through the local emergency number. Do not use squeezing or foot movement to try to rule out a clot. [3]

Make stopping easy

Agree on spoken words such as “lighter,” “pause,” and “stop.” If speech is difficult, agree on a reliable signal before contact. Do not proceed when reliable consent and feedback are unavailable.

If the person pulls away, tightens, or goes unexpectedly quiet, stop movement and ask what they want. Behavior can prompt a check; it does not tell you the cause. Support the limb as needed while ending contact safely. Resume only if the concern is resolved and the person actively chooses to continue.

Mini scenario: Your partner says the left calf has been unusually swollen since yesterday. The next step is to defer practice and arrange appropriate assessment, not to compare the legs with deeper pressure.

Lessons

Lesson 1 · Watch the whole session

Outcome: Identify the core skills without treating a recording as a sequence everyone must copy.

Proposed narration

“As you watch this session, pay attention to how contact begins and how it changes. You do not need to remember every movement on your first viewing. Start by watching where the foot is supported and when I move from one foot to both feet.

“I originally learned to complete one foot and then the other. Over time, I began working in sections, moving between feet. I also began using one hand on each foot for parts of the session. I noticed a difference in the experience when I worked that way. That is my personal observation; you do not have to feel the same thing or use that arrangement all the time.

“Some movements need two hands on one foot. Other moments allow contact with both feet. We will learn how to choose between them while keeping the person comfortable. Your hands do not have to stay busy every second. Pausing, listening, and supporting are part of the work.”

Descriptive teaching order

  1. Permission and supported settling contact.
  2. Gentle lower-leg warm-up, where appropriate and within scope.
  3. Finger contact around the ankle.
  4. Heel cradle and small supported ankle movement.
  5. Smoothing contact along the foot.
  6. Still contact with one hand on each foot.
  7. A supported transition to individual-foot work and back.
  8. A clear, comfortable ending.

These are proposed course labels. “Warm-up” describes an opening phase; it is not a promise to improve blood flow or correct circulation. Ruth’s exact named sequence remains hers to establish from the demonstration.

Watch and pause: Identify one supporting hand and one moving hand. If the camera hides either, mark “not visible” rather than guessing.

Check: Must every technique be done on both feet at once? No. Support, comfort, and the movement’s requirements determine the arrangement.

Practice & reference

Visual guide to the contact cycle

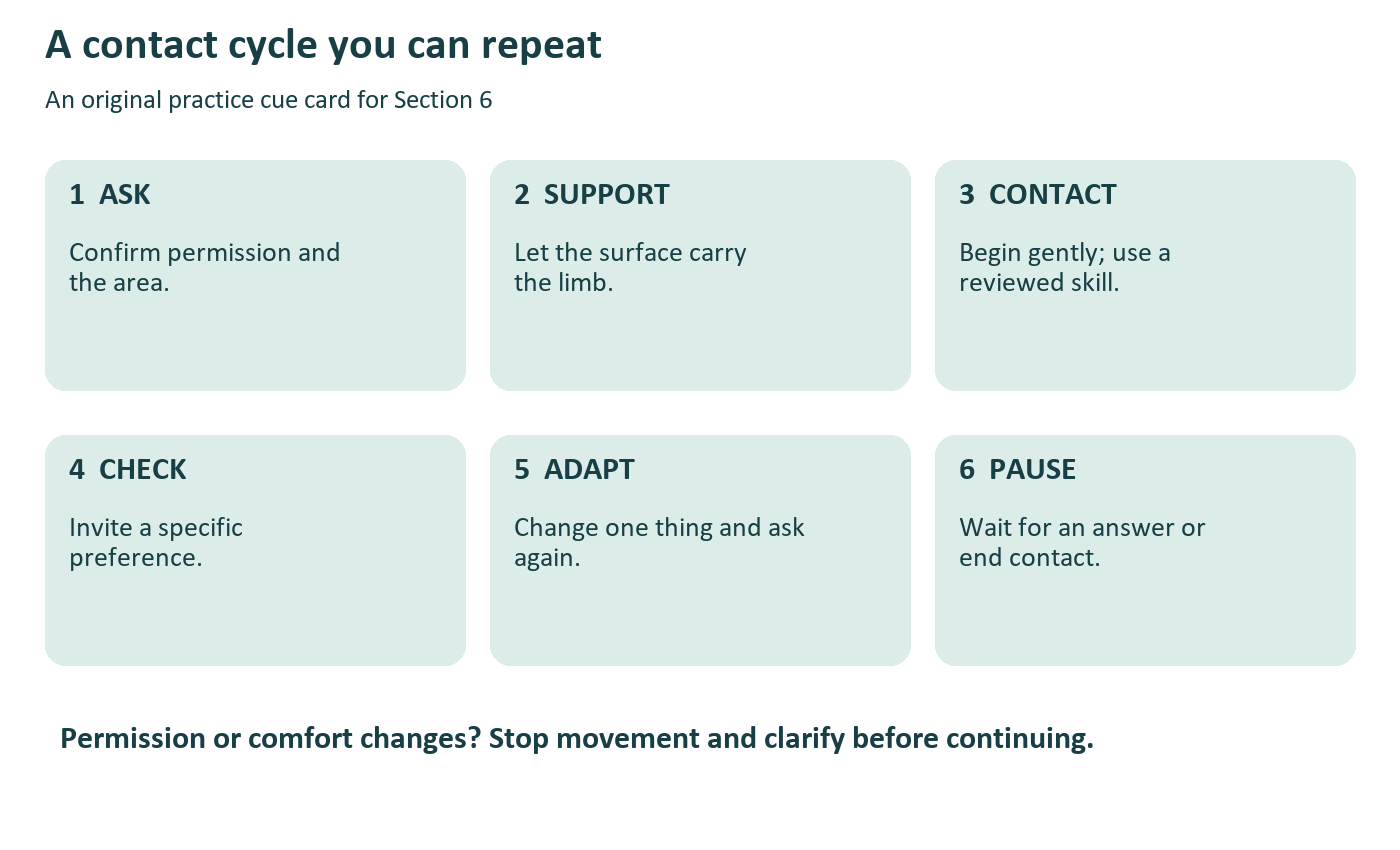
Six steps in a contact cycle: ask, support, contact, check, adapt, pause. Stop when permission or comfort changes.

Use this card beside your practice space. It is a decision guide, not a fixed number of strokes or a rule to keep touching.

Ask: Confirm the area and the proposed action. Support: Make the limb comfortable before movement. Contact: Begin gently. Check: Invite a specific preference. Adapt: Change one thing and ask again. Pause: Allow an answer or stop completely.

Spot the missing step: A student asks permission, immediately rotates the foot, and then tries to find a comfortable grip. Support needed to come before movement.

Remember: Continuing contact during a transition is optional. A controlled, explained release is better than awkwardly maintaining touch.

Lessons

Lesson 2 · Begin with support

Outcome: Start slowly and distinguish broad comfortable contact from gripping or digging.

Proposed narration

“Before I move anything, I make sure the leg and foot are comfortably supported. My hand is meeting the foot; it is not squeezing it into position. I begin gently, then ask how that feels.

“My opening often includes work around the calf and inner lower leg before I move toward the ankle and foot. In this course, watch that as an example of how I begin. We are not trying to force circulation or press through discomfort. A beginner should keep this opening simple, stay within their training, and leave out any area that is unsuitable.

“Look at the difference between the hand providing support and the hand making the movement. If the leg shifts or the person braces, I stop and reset. I do not use a stronger grip to make the movement happen.”

Card A Supported settling contact

Placement and support: Rest the lower leg on a comfortable stable surface with padding as needed. Rest a broad hand comfortably against the heel or side of the foot without trapping the toes. Keep your own wrists relaxed. Adjust the setup rather than reaching or carrying the weight of the leg in your hands.

Movement: Begin with still contact. Before any change, explain what you intend to do. This is a proposed beginner exercise, not a supplied signature hold.

Communication: “Would you prefer this contact lighter, the same, or for me to take my hand away?” Wait for the answer and act on it.

Pause: After first contact, after repositioning, and whenever the person’s response is unclear.

Common mistake: Squeezing to feel secure. Reset: Let the surface carry the limb, soften the hand, and recheck comfort.

Practice: Rehearse approaching and leaving a model three times. With a suitable partner, practice one permission question and one preference adjustment. Success is a clear response and a controlled change, not a sensation the partner is expected to report.

Practice & reference

Technique card for the lower leg

Card B Gentle lower leg warm up

Status: Ruth described calf and inner-shin opening work. The details below are a conservative teaching proposal, not a reconstruction of her exact strokes. Observe her footage first; model rehearsal is appropriate until her demonstration confirms the contact and pathway.

Placement: Use a broad palm or soft finger pads on suitable soft tissue of the lower leg. Avoid pressing directly onto the sharp shin edge, behind the knee, over prominent veins, or onto irritated, injured, or unusually tender areas. Obtain specific consent for this area.

Support: Keep the lower leg resting on its padded surface. Use the other hand only for comfortable stabilization, without clamping the ankle or compressing the calf.

Movement: Rehearse a short, light smoothing pass on a model. With an appropriate partner and instruction, use slow comfortable contact without deep kneading or forceful squeezing. Do not invent a fixed route or repetition count to “move blood.” Skip lower-leg contact if its suitability or your permitted scope is uncertain. [2]

Pressure conversation: “How does that feel on your lower leg? Would you like less contact or for me to stay with your feet?” Silence is not a request for more pressure.

Pause: After the first pass, before changing sides, and at any unexpected response. New unexplained pain or swelling is a reason to stop and seek assessment, not to change to a stronger technique. [3]

Common mistakes: Rubbing quickly to create warmth; digging beside the shin; continuing because the other leg tolerated it; treating skin warmth as proof of circulation improvement.

Useful video evidence: The full contact area, both hands, the resting leg, and an audible preference check. A close crop of the moving hand alone cannot show whether support is adequate.

Observation task: Describe one visible action without a physiological claim. Example: “The hand moved slowly along the lower leg; the partner said it felt comfortable.”

Lessons

Lesson 3 · Ankle contact and movement

Outcome: Recognize supported movement and avoid forcing range or confusing observation with joint assessment.

Proposed narration

“Around the ankle, notice how small the working area is. Watch the pads of my fingers, the supporting hand, and the person’s response. More pressure is not automatically more useful.

“When I hold the heel and move the foot, I am noticing how comfortable that movement seems for this person today. I am not diagnosing the joint or trying to increase its range. Small movement may be enough, and no movement is also an option.

“A video can show you where my hands are. It cannot tell you exactly how much pressure I am using. That is why you will hear me ask and why I want to hear your conversation in your own practice recording.”

Card C Finger contact around the ankle

Status: Ruth described finger techniques here but did not specify the finger, pathway, or pattern. Do not label an invented movement as her method. Use the recording to establish those details before teaching the full technique.

Beginner rehearsal: With the leg resting securely, use relaxed finger pads for light still contact beside, rather than onto, the ankle bones. The other hand comfortably supports the foot. Do not hook behind a bone, dig into grooves, or press onto the Achilles tendon. No joint levering.

Movement: Begin with still placement on a model. Copy a moving pattern only once Ruth has made its placement and direction visible and confirmed it for this lesson.

Ask and pause: “Is this spot comfortable, or would you prefer I move away?” Stop at tenderness, tingling, numbness, or withdrawal. Do not search for a “sore point” to prove a reflex connection.

Common mistake: Using fingertips or nails to find a precise point. Reset: Broaden and soften contact, or omit it.

Useful footage: A slow repeat from the same session showing finger pads and ankle landmarks, with the unedited interaction preserved. The editor may crop the source footage if the original image is clear enough.

Practice & reference

Technique card for supported movement

Card D Heel cradle and small ankle circles

Status: Based on Ruth’s report that she holds the heel and rotates the ankle each way. Exact grip, range, and pace must match her reviewed demonstration. This card sets conservative boundaries; it does not teach clinical joint mobilization.

Placement: Cup beneath the heel with one hand. Let the other hand broadly support the foot nearer the forefoot, without pulling individual toes or gripping them as a lever. Keep away from painful areas.

Support: The lower leg remains comfortably supported. Arrange yourself so the knee and leg are not dragged sideways. If you cannot control the movement comfortably, stop and change the setup.

Movement: First rehearse on a model. With a suitable, consenting partner and demonstrated instruction, make a small slow comfortable circle in one direction, return to rest, check, and only then consider the other direction. Stay well within comfortable motion. Do not chase a larger circle, push through resistance, apply traction, or attempt a release or a crack.

Pressure and permission: “Would you like to try a small movement, or stay still?” Then: “Was that comfortable? Smaller, the same, or stop?” Comfort on the first side does not establish permission or comfort on the second.

Pause: Before moving, between directions, before the other foot, and immediately if pain, resistance, guarding, dizziness, or a stop signal occurs. Let the foot return to a supported resting position without forcing it.

Common mistakes: Twisting the whole leg; using toes as handles; comparing range competitively; repeating until resistance disappears; allowing the heel to drop when changing hands.

Practice check: Can the observer see heel support, the second hand, the resting lower leg, and the pause? If not, adjust the camera before interpreting the technique.

Alternative: Still supported contact, or observation only. Skipping rotation when it is inappropriate demonstrates judgment rather than failure.

Lessons

Lesson 4 · Smoothing and pressure conversation

Outcome: Use a feedback loop instead of guessing pressure from appearance.

Proposed narration

“As I smooth along the foot, watch for an easy pace and continuous support. A smooth-looking stroke can still be uncomfortable, so I ask the person. I might say, ‘Would you like that lighter, the same, or for me to stop?’

“If someone says ‘lighter,’ I change it. I do not explain why they should tolerate it. After making a change, I check again. Sometimes the best adjustment is a different position or simply still contact.

“If the person pulls away, I pause before deciding what it means. It may be ticklish, uncomfortable, or something else. Asking gives us information that a theory cannot.”

Card E Smoothing along the foot

Placement and support: Use broad palm contact or soft finger pads over an agreed comfortable surface of the foot. The other hand supports the heel or resting foot. Avoid digging across bony edges or dragging the skin.

Movement: Make one slow short pass along the demonstrated area, soften at its end, and return without pulling the toes. Ruth described “up the foot” but did not identify exact surfaces or endpoints. The final video must show these; do not turn this wording into an assumed organ pathway.

Communication: Ask after the first pass and after changing area, pace, or pressure. Make one change at a time so you can tell what the person preferred.

Pause: When there is friction, skin pulling, discomfort, or uncertainty. Reduce or stop contact and reassess; do not add force to make the stroke smoother.

Common mistake: Repeating the same pass while looking away and missing feedback. Reset: Slow down, ask, and make a visible adjustment.

Practice activity: Your partner requests one genuine change, if needed. Say what you will change, make it, and check the result. Do not stage discomfort or deliberately press too hard for the camera.

Practice & reference

Visual guide to pressure communication

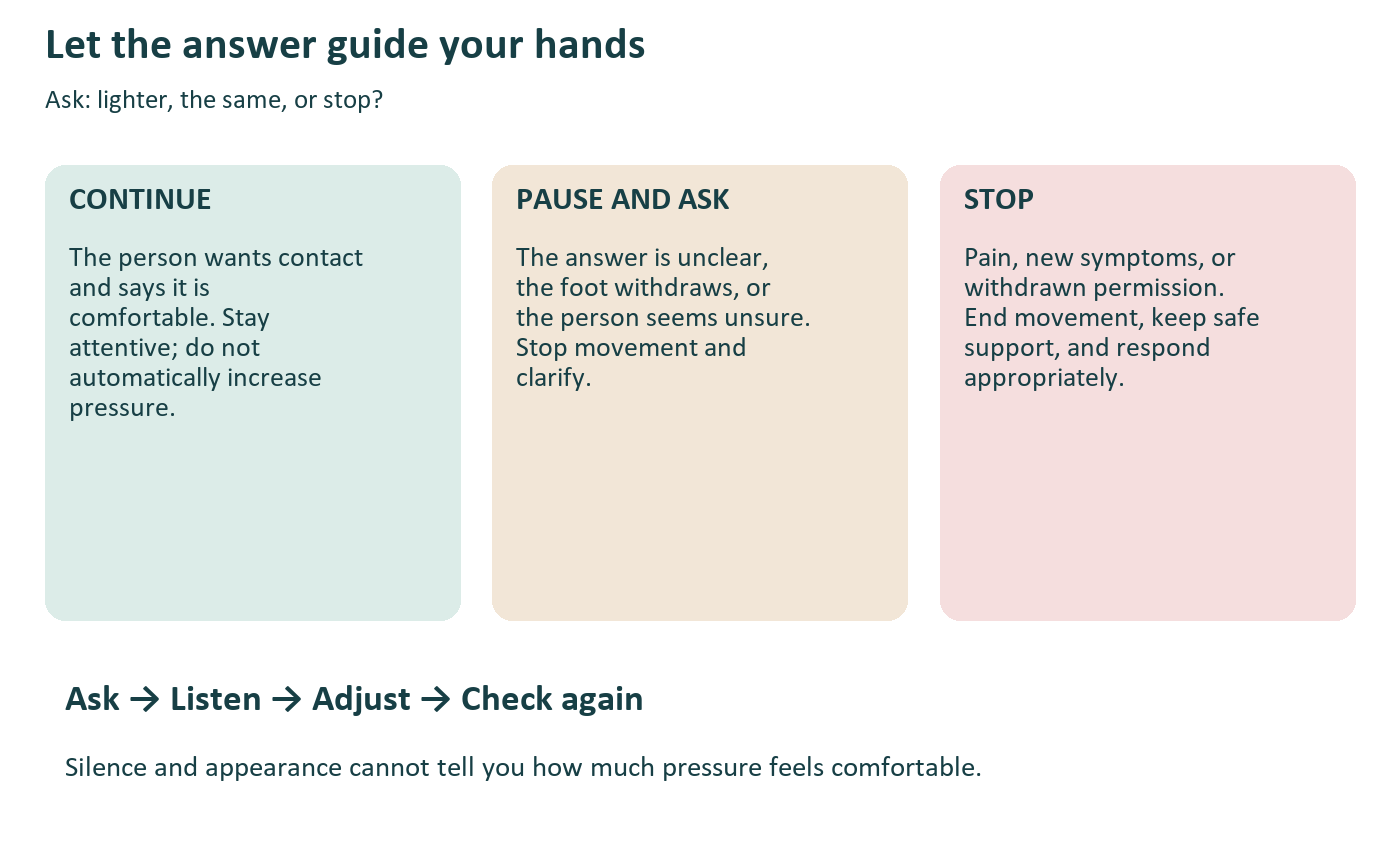
Pressure communication guide: continue when wanted and comfortable, pause to clarify uncertainty, stop with pain or withdrawn permission.

An example you can use: “Lighter, the same, or stop?” → “Lighter.” → “I’m easing off now.” → “Is this comfortable, or would you prefer no contact here?”

Words accompany the colors so the card works without color recognition. There is no universal pressure number or minimum pressure target in this module.

Predict the next move

Scene 1: The partner says, “It’s okay, I suppose,” while drawing the foot away. Pause and clarify. Do not treat “okay” as permission to continue unchanged.

Scene 2: The partner says, “I can barely feel it,” and has reduced sensation. Do not increase pressure to chase sensation. Defer that practice and obtain appropriate guidance.

Scene 3: The partner says, “That feels comfortable.” Maintain the agreed approach, remaining responsive. Do not automatically increase pressure to create a stronger effect.

Lessons

Lesson 5 · Both feet and individual foot work

Outcome: Choose a hand arrangement that gives adequate support and make a deliberate transition.

Proposed narration

“When I place one hand on each foot, I sometimes notice a change in the quality of the session. You may notice something different. Ask what the person experienced, and let their words stand on their own.

“Working on both feet does not mean forcing matching movement. The two feet can have different preferences. If one movement needs a supporting hand and a working hand, I return to one foot. I do not give up support just to stay connected to both feet.

“Before changing sides, I let the current movement finish, allow the foot to rest, and reposition. A quiet transition can still be clear. If I need to remove both hands to adjust something, I explain that and do it.”

Card F Still contact with both feet

Placement and support: With both feet comfortably supported on the surface, rest one relaxed broad hand on each foot in an agreed comfortable position. Keep your posture easy; reposition the feet or seat with consent if you are stretching to reach.

Movement: Begin with still contact. This is the basic two-foot practice. Do not attempt two simultaneous ankle rotations or any movement that needs two hands for safe support.

Communication and pause: “How does this feel compared with one foot at a time?” Accept “no difference” as a valid answer. Pause when either side needs adjustment; asymmetry of preference is allowed.

Common mistake: Pressing one side harder because of your seating position. Reset: Adjust your position, lighten contact, and ask separately about each side.

Observation note: Write what you saw and what the partner said. “Both feet were still; the partner said this felt restful” is useful. “Their energy was balanced” is an interpretation, not a demonstrated result.

Practice & reference

Technique card for transitions and endings

Card G Move from both feet to one foot

Placement and support: Let both feet rest securely. Explain that you are changing to one foot. Release the hand that will move, then establish comfortable support on the selected foot before beginning its next movement.

Movement: Practice the hand change without adding a stroke. Only once support is established should the working hand move. Returning to both feet follows the same principle: finish, rest, reposition, ask, continue if wanted.

Communication: “I’m going to give this foot a little individual attention. Are you comfortable as we change?” Pause if equipment, draping, or your seating needs adjustment.

Common mistakes: Dropping the heel; moving while the grip is still changing; crossing wrists awkwardly; leaving the other foot unsupported; using simultaneous contact as a rule rather than an option.

Card H A considerate ending

Status: Ruth specifically wants to review endings but did not supply her exact ending. This is a proposed beginner closing exercise for her adoption or replacement.

Placement and support: Allow the final movement to finish. Leave each foot resting comfortably. Offer still contact with one or both feet only if the person wants it.

Movement and pause: Slow and stop. Tell the person you are finishing, release contact gently, and give them time to reorient before changing position. There is no mandatory hold duration or breathing pattern.

Communication: “We’re coming to the end. Would you like a moment of still contact, or would you prefer I finish now?” Then: “How are you feeling? Take your time before sitting up.” Respond to discomfort or lightheadedness; do not rush standing.

Common mistakes: Ending abruptly, moving straight to a sales conversation, declaring the person healed, or standing them up immediately.

Practice: Rehearse one opening, one transition, and one ending. Use a model to practice the physical sequence and a peer to practice the conversation.

Lessons

Lesson 6 · Shape the session

Outcome: Explain why a shorter session may use more two-foot contact while a longer one may alternate arrangements.

Proposed narration

“A longer session does not need to be a shorter sequence stretched out. I can warm each foot individually, work with both feet, and then return to an individual sequence. I may move between those arrangements several times.

“When the foot portion is shorter, I may spend much of it with one hand on each foot and include only a brief individual section. I still make room for support, feedback, and a proper ending. If the person’s needs change, the plan changes.

“You may see a red-light device in some of my sessions. It is an optional part of my practice, not something you need to copy to learn contact. For this section, practice the hand transitions without a device.”

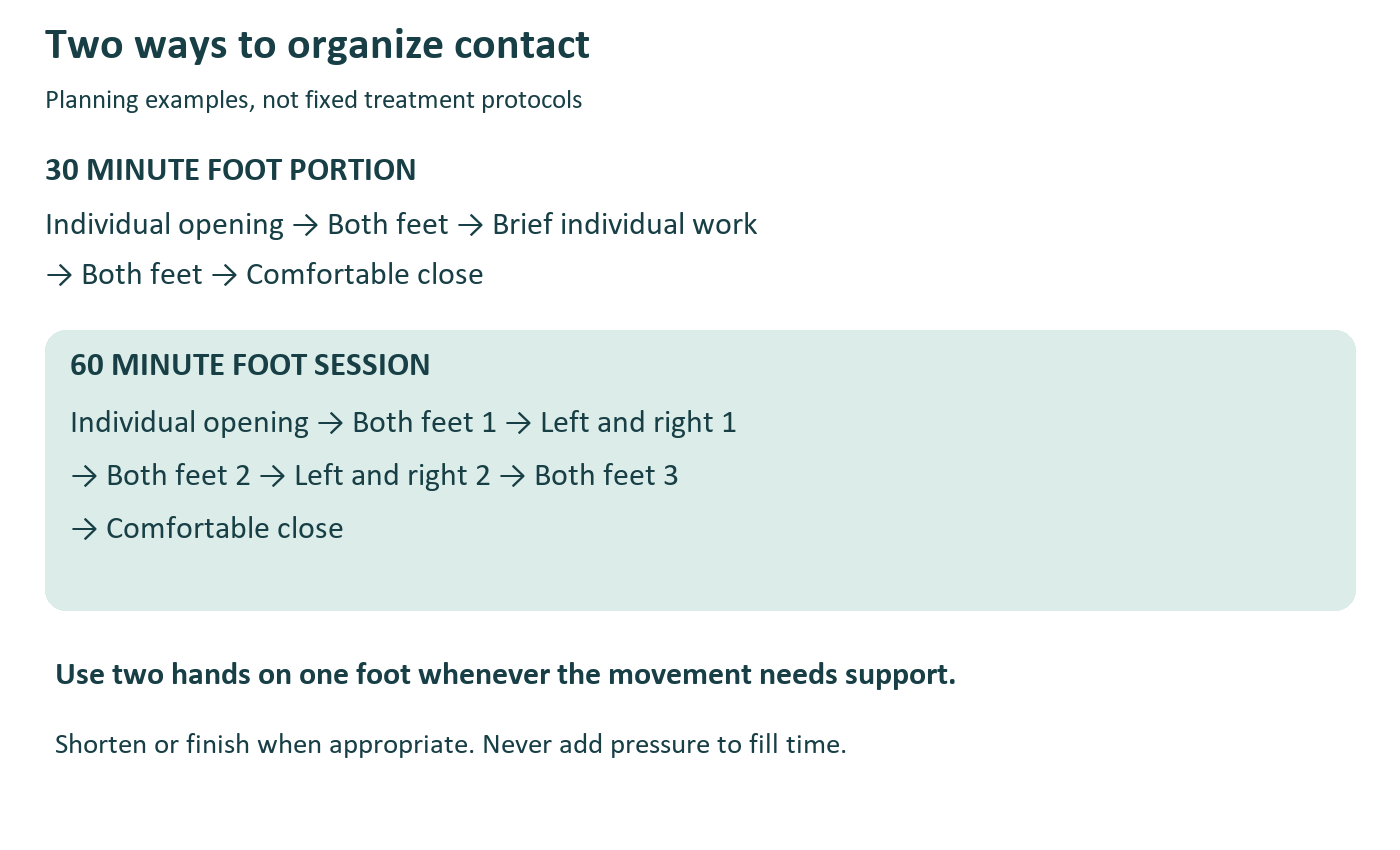
The plan below is a teaching example: Ruth described the pattern, not these minute allocations or the internal content of each sequence. Insert only reviewed techniques within each block. Neither schedule is a claim of a complete approved treatment protocol.

Session flow comparison showing a 30-minute foot portion with mostly both-feet contact and a 60-minute example alternating both-feet and individual-foot blocks.

Keep the priority clear: If safe comfortable contact cannot meaningfully fill the time, shorten or end the session. Do not add pressure, repetitions, or unsupported techniques to meet a clock.

Practice & reference

Two sample session plans

Thirty minute foot portion

This is 30 minutes allocated to the feet after any separately taught head work. It does not teach or authorize head techniques.

Time Arrangement Purpose
0–4 Individual feet Recheck consent and comfort; gentle opening on each
4–12 Both feet Reviewed two-foot contact with preference checks
12–16 Individual feet About two minutes each, adjusted to need
16–27 Both feet Reviewed comfortable contact and pauses
27–30 As preferred Slow, finish, release, check comfort

Sixty minute foot session

Time Arrangement Purpose
0–8 Individual feet Supported opening on each foot
8–16 Both feet block 1 Begin a reviewed shared-contact sequence
16–28 Individual pair 1 Left then right, about six minutes each
28–36 Both feet block 2 Reconnect and check preference
36–48 Individual pair 2 Left then right, about six minutes each
48–56 Both feet block 3 Comfortable reviewed sequence
56–60 As preferred Closing and unhurried transition

The opening plus two individual pairs gives three individual-work periods; the middle includes three both-feet periods. Starting side is an example, not a requirement. Equality of minutes is less important than suitability and consent. Short shared-contact transitions may be inserted between left and right without lengthening the total block.

Optional equipment note: Ruth called her device a red-light therapy “slide.” The model and instructions were not supplied. Do not infer dose, placement, temperature, eye protection, or suitability. If retained in teaching footage, label it optional and refer to a separate device-specific lesson based on verified manufacturer instructions and appropriate screening. No student device use is assessed here.

Lessons

Lesson 7 · What your video should show

Outcome: Submit a beginning and ending that let Ruth see support and hear your response to feedback.

Proposed narration

“The most useful parts for me to review are the beginning and the end of your session. At the beginning I want to see how you introduce contact and respond to the person. At the end I want to see how you finish and leave them comfortable.

“Keep enough of the picture in view for me to see both of your hands, the feet, and the support under the legs. I also need to hear your questions and the person’s answers. A beautiful close-up with no sound may hide the decision I need to understand.

“You do not need a perfect performance. Show your real adjustment, and tell me one thing you would like feedback on. If a technique in the middle is not visible, I may ask for one short extra clip.”

Proposed submission brief

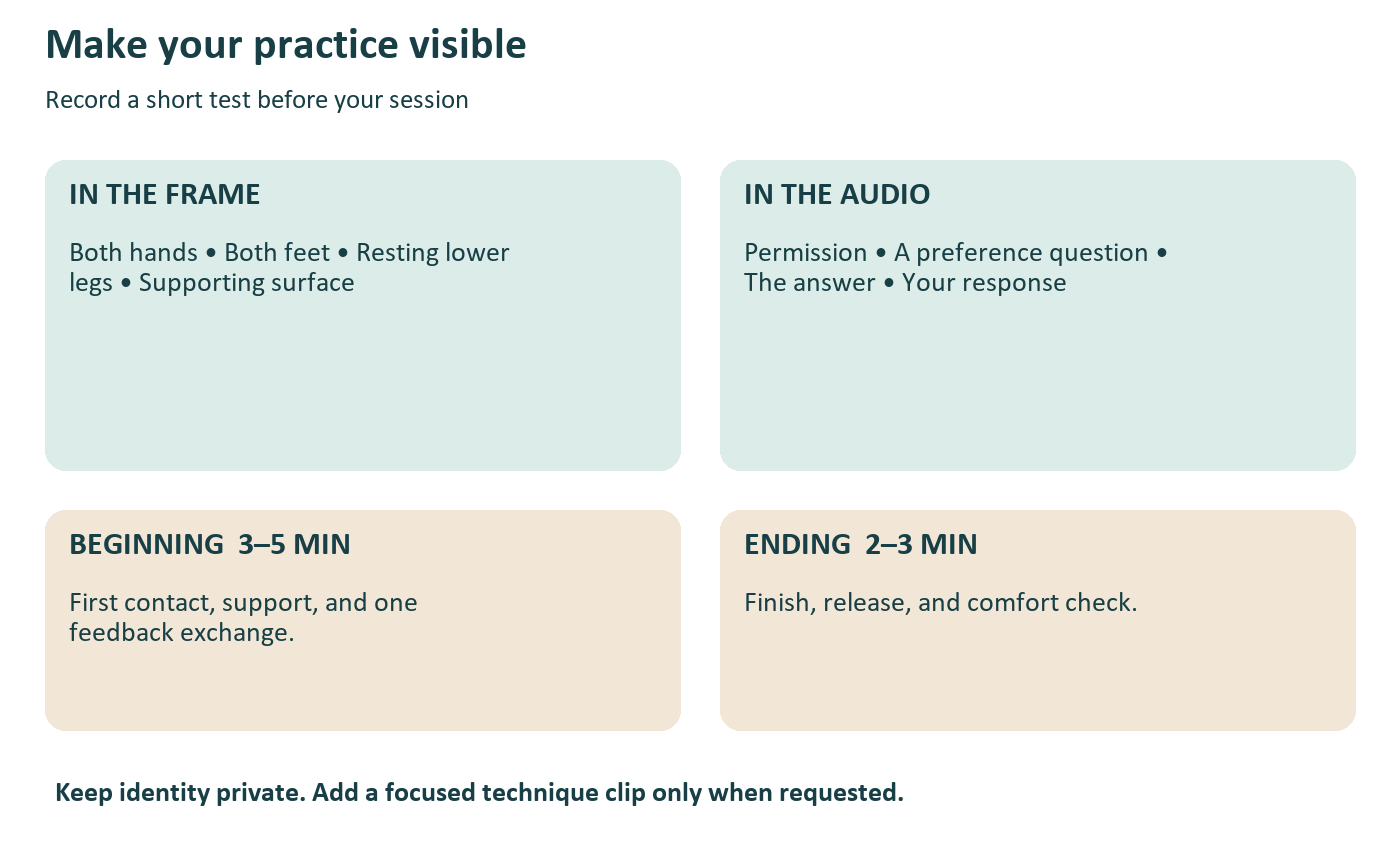
Clip A — Beginning, 3–5 minutes: Include permission to begin, comfortable support, first contact, one pressure or preference check, and an actual response or transition. If the person prefers no movement, show that choice and explain the alternative.

Clip B — Ending, 2–3 minutes: Include the final contact, communication that the session is ending, a controlled release, and a comfort check. Prefer the same practice session as Clip A; label clearly if it is a different session. Do not speed up or edit away the interaction within either clip.

Only if requested — Focus clip, 30–90 seconds: Show the specific unseen skill or correction Ruth requests. The beginning and ending alone cannot establish competency in every technique or in the whole session.

Accompanying note: Session date or practice code; model or partner; total practice duration; techniques omitted and why; one timestamp to review; one thing you changed after feedback; one question for Ruth. Avoid unnecessary health details.

Consent and privacy: Obtain permission for both touch and recording, including who will view the clip. Keep faces and identifying details out where practical. Use the course’s private submission route; do not post publicly. The course owner must establish access, retention, and deletion arrangements before collecting submissions.

Practice & reference

Visual guide to recording

Recording checklist showing both hands, both feet, lower-leg support and clear audio, with separate beginning and ending clips.

Set up before practice: Use a fixed, stable camera beside or diagonally beyond the feet. Keep the device and stand out of walkways. Include enough lower leg to see support and avoid filming the face unnecessarily.

Ten second test: Record yourself moving from both feet to one foot on a model. Play it back. Can you see the heel and supporting hand throughout? Can you hear a quiet question and answer? Adjust before the real recording.

Keep it honest: Do not add voiceover in place of the real consent conversation. A separate explanatory note is useful, but it cannot show whether you heard and responded to the person at the time.

Accessible alternative: If speaking while working is difficult, agree on a reliable communication method and document it. Captions or a transcript help the reviewer; they must reflect the actual interaction. If partner recording is not possible, submit a model demonstration and a role-play discussion, with real-person competency assessed later.

Review prompt: “At 01:15 I change from both feet to the left foot. Is the heel adequately supported before my working hand moves?”

Practice & reference

Feedback that helps the next attempt

Use observed action → effect or uncertainty → one change → focused retry. Feedback should describe a visible or audible event, not infer the pressure or a medical result from the picture.

Criterion Evidence Ruth should see or hear Score
Consent Permission, options, and respect for a change of mind /2
Support Stable resting leg and support before movement /2
Contact Gentle entry and visible placement suited to the task /2
Communication Specific question, answer, and corresponding adjustment /2
Movement judgment Small controlled demonstrated movement or justified omission /2
Transitions Movement ends before grip or hand arrangement changes /2
Ending Clear finish, controlled release, and comfort check /2
Reflection Accurate timestamp and one concrete learning point /2

Proposed scale: 0 = unsafe or absent; 1 = partly demonstrated and needs coaching; 2 = clearly demonstrated in this clip. Use NV for not visible or not audible; request focused evidence rather than guessing or scoring it zero. Do not use a summed score as a professional certification.

Suggested readiness rule: Consent, support, response to feedback, and safe stopping must each be clearly demonstrated. Any unsafe action requires correction and reassessment. Other weaker areas receive a focused retry; NV items remain unassessed. This is a proposed teaching rubric for Ruth to adopt, not an existing school policy.

Example feedback: “At 00:48 your heel-supporting hand leaves before the foot reaches the cushion. The foot briefly drops. Let it settle onto support before changing hands. Please send a 45-second retry showing that transition and your comfort check.”

Example communication feedback: “At 01:10 the partner asks for lighter contact, but I cannot hear a follow-up check. After easing off, ask whether that change is comfortable. Show that exchange in your next opening.”

Reviewer limit: These clips show selected behavior. They cannot establish applied force, internal physiological changes, competence in unshown movements, or readiness for independent professional practice.

Lessons

Lesson 8 · Optional reflexology maps

Outcome: Use a map as a clearly identified learning reference without turning symptoms into a self-directed organ treatment.

Proposed narration

“Some students enjoy using reflexology charts. I appreciate those visuals as learning resources, even though I do not use them throughout every session. You can study them alongside the session work you see here.

“A label such as ‘lung’ or ‘esophagus’ belongs to the chart’s reflexology system. It does not mean that a tender place on a foot diagnoses a problem in that organ, or that a movement is proven to treat it. If someone has symptoms, we keep appropriate medical care separate from this learning exercise.

“You may hear a student describe a meaningful experience after working with a map. We can listen respectfully while separating what they did, what the person reported, and what remains an interpretation. You do not need an organ chart to pass this contact module.”

A chart reading exercise

Use Quanta’s official introductory page as optional reading, or a chart you can lawfully access. Identify its publisher, orientation, right or left foot, legend, and the system it teaches. Charts may differ. Do not combine a pathway from one with labels from another without identifying the change. [4]

Choose the label “lung” or “esophagus” if it is present. Record the chart’s label and location in words. Then write: “This is a traditional correspondence in this named system, not an anatomical organ location in the foot.” This is a reading task, not an instruction to work on a symptomatic person. NCCIH notes that the claimed healing effects through these correspondences have not been proven. [1]

Finger walking boundary: Ruth reported a student’s story about finger walking; she did not supply or endorse an exact pathway in these notes. No organ-specific finger-walking route is a required skill here. Teach it separately only with a specified method, reviewed demonstration, clear scope, and suitable instruction.

Visual choice: This package supplies original learning cards rather than reproducing Quanta artwork or inventing an organ map. Link students to the official resource. If a particular chart is later chosen for inclusion, confirm its permission terms, preserve its attribution and legend, and use it as an optional reference. [4]

Practice & reference

Practice workbook

Round one Observe without interpreting

Choose two minutes of Ruth’s footage. Record what is visible; use “not shown” for details the camera does not reveal.

Moment Your notes
Supporting hand and surface
Moving hand and contact area
Question and answer
Pause or transition
One detail I cannot determine

Round two Rehearse one change

On a model, rehearse settling contact and the both-feet-to-one-foot transition. Then, if appropriate, practice a single reviewed skill with a consenting partner. There is no requirement to perform every movement in one practice.

Moment Your notes
Skill chosen and reason
Permission or limits expressed
Exact preference the partner gave
What I changed
What they said after the change

Round three Plan your submission

My opening will show: __________________________________________

My ending will show: ___________________________________________

One timestamp and question for Ruth: ____________________________

One technique I omitted and why: ________________________________

Success reflection: Describe a decision you made well. It may be a decision to stop, simplify, or omit a movement.

Practice & reference

Learning check and answers

Try the questions before reading the answers. Explain the action you would take, not just the term you remember.

  1. Your partner prefers still contact. Must they try ankle rotation to complete practice?
  2. A foot moves away while the partner says “fine.” What happens next?
  3. You can see the smoothing hand but not the supporting hand. Can you assess support?
  4. Why might a movement require individual-foot work rather than one hand on each foot?
  5. Does warmth after lower-leg contact establish improved circulation?
  6. A calf has new unexplained pain and swelling. What do you do?
  7. A chart labels an area “lung.” Does tenderness there establish a lung condition?
  8. A 60-minute plan is becoming repetitive and the person wants to finish. What takes priority?
  9. What are the two core submissions, and when is a third clip useful?
  10. What should your ending contain if Ruth has not yet specified a signature closing sequence?

Suggested answers

  1. No. Respect the preference. Demonstrate the alternative and explain the omission; movement competency remains to be assessed separately if required.
  2. Stop movement, maintain safe support, and clarify comfort and permission. Do not guess the cause.
  3. No. Mark it not visible and obtain a better view or focused clip.
  4. One hand may need to support while the other works. Adequate support determines the arrangement.
  5. No. Describe warmth as a sensation or observation without inferring a physiological change.
  6. Defer contact and seek urgent medical assessment. With chest pain or breathlessness, seek emergency help. [3]
  7. No. Chart correspondences do not diagnose organs. Symptoms require appropriate healthcare. [1]
  8. The person’s choice and comfort. Finish safely rather than filling the remaining time.
  9. Beginning and ending. An extra short clip is useful for an unseen technique or a specific correction.
  10. A communicated finish, supported rest, optional still contact if wanted, gentle release, and a comfort check. This is the proposed course closing, not a claim about Ruth’s exact method.

Teach back: In one minute, explain how you choose between both-feet and individual-foot work. Include support, preference, and the option to stop.

Production & sources

Production guide for full session footage

Keep the full-session recording as the visual backbone. Use chapter markers, captions, occasional replay, and short reflection cards to make the decisions visible. Separate technique films are not required if the original footage clearly shows the technique.

Scene Footage to use Teaching cue
First contact Real opening with permission and setup “What supports the foot?”
Lower leg Agreed calf and inner-shin work “Broad contact and comfort”
Ankle Clear finger placement from the session “Watch the supporting hand”
Heel movement Small rotation with both hands visible “Pause before changing direction”
Smoothing One clear pass and actual feedback “Ask and adapt”
Both feet One hand resting on each supported foot “Both feet can feel different”
Transition Full hand change without a cut “Support before movement”
Ending Last contact through final check “Give the ending time”

Audio: Use voiceover to explain decisions. Briefly lower it or pause it when the original permission question, answer, or adjustment matters. Include captions and a readable transcript; distinguish voiceover from the live exchange.

Attention rhythm: Open each lesson with one question to watch for. Let the matching action play, then offer a pause-and-notice prompt. Replay a key moment once at slower speed when helpful, clearly labeled “slow replay.” Preserve a real-time example so students can judge pace.

Alignment: Do not narrate rotation over unrelated smoothing footage. Move to the relevant part of the same full session. If an essential grip is obscured, add a close view or a later pickup demonstration; narration cannot replace missing visual evidence.

Overlay discipline: Keep cues brief and away from hands and feet. The optional map discussion can be a separate resource card while the session continues; do not superimpose invented organ pathways on Ruth’s hands.

Accessibility: Use high-contrast text, spoken explanations of important visual changes, pause controls, and downloadable cue cards. Avoid decorative music that masks pressure feedback.

Production & sources

Instructor review and source notes

Written materials are complete as a teaching draft. This package does not contain Ruth’s actual session videos, certify her exact grips, or claim that the sequence has been approved for learner use.

Before recording the final narration, Ruth should confirm the descriptive names, lower-leg contact boundaries and direction, ankle finger pattern, rotation grip, smoothing surfaces and endpoints, movements suitable for both feet, and her preferred closing. Match each adopted technique to visible footage. This is a targeted content check, not a request to film separate technique videos.

The course owner should also adopt or adjust the sample timings, rubric, private submission arrangements, and any optional chart choice. Device instruction remains separate until the actual equipment and manufacturer directions are known.

Sources and what they support

Ruth’s supplied Section 6 account, September 24 2026. Primary source for her described opening, evolving session structure, full-session video preference, optional chart interest, device mention, and beginning-and-ending review preference. Her “blood movement” purpose and energetic observations are preserved as her explanations, not presented here as verified mechanisms.

[1] NCCIH Reflexology. Supports the distinction between reflexology correspondence claims and established evidence. It does not validate the specific practice exercises in this module.

NCCIH Reflexology

[2] NCCIH Massage Therapy What You Need To Know. Supports cautious risk framing and appropriate medical guidance. The conservative placement and practice boundaries in this package are curriculum proposals, not quoted protocols from this page.

NCCIH Massage Therapy

[3] NHS Deep vein thrombosis. Supports recognition of concerning leg symptoms and urgent or emergency escalation. Use the learner’s local healthcare and emergency routes rather than assuming UK telephone numbers.

NHS Deep vein thrombosis

[4] Quanta School of Reflexology Understanding Reflexology. Optional primary source for that school’s explanation of zones. Its existence and content were checked; inclusion is not an endorsement of medical claims, confirmation of artwork licensing, or a claim that Ruth teaches its system.

Quanta Understanding Reflexology

All web sources accessed September 24 2026. The four original visual learning cards depict course decisions and workflow, not organ-treatment pathways.

A note for this section

Review workspace

Where your comments live

Connect to the website to share notes with each other. On a static host, use this browser and export your comments to share them.

The access code is in the separate upload guide. Everyone with it can read, edit and resolve review notes.


Device comments are kept in this browser, not sent to anyone. Export a backup before clearing browser data or switching devices.