REFLEXOLOGY REVISITED · COURSE REVIEW EDITION
← All chapters

Chapter 07 / 12 · 7 lessons

Your first complete session

Bring the pieces together into a clear, unhurried beginner session.

Review marks stay on this device.

Lessons

Chapter overview

Reflexology with Ruth • Section 7

Learn to connect familiar techniques into a session with a clear beginning, a comfortable middle, and an unhurried ending. Your first goal is continuity: knowing where you are, responding to the person, and moving to the next step without rushing.

The beginner model: a 30-minute feet-only practice session. Learn one repeatable route before adding head work or extending to an hour. This is a proposed teaching structure built from Ruth’s account, not a claim that she uses this exact minute-by-minute protocol.

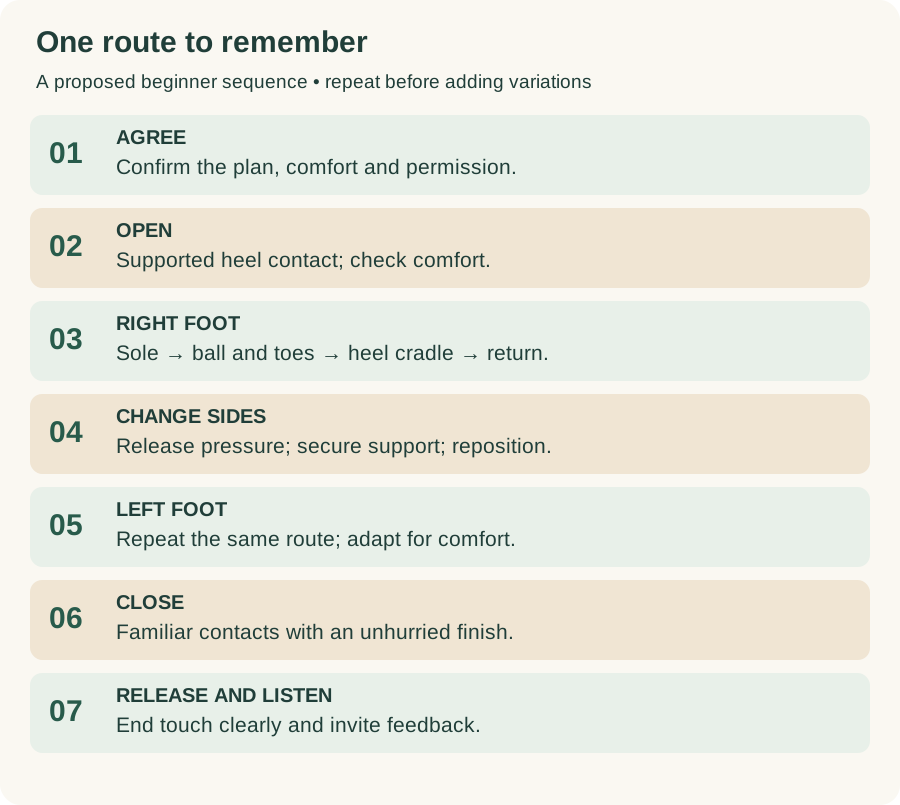
Session route from agreement through opening, first foot, transition, second foot, closing and feedback

What you will be able to do

  • Explain and follow a complete 30-minute session plan.
  • Make clear opening contact and transition without abandoning support.
  • Match the intention and approximate pacing of comparable work on both feet, adapting to feedback.
  • Use brief check-ins and recover when you lose your place.
  • Close on time and record where continuity became difficult.

Before partner practice: complete Section 2 consent and safety, Section 5 preparation, and supervised instruction in the exact Section 6 techniques you will use. Learn and rehearse the proposed contact patterns below with an instructor before combining them. The method is intentionally gentle; point-specific pressure techniques belong in separate technique instruction. If those techniques are not yet learned, rehearse the order on a model without pressure practice on a person.

Lessons

Your learning route

Watch the whole session then notice the details

Ruth wants students to see the sequence repeatedly, with her hands showing what words cannot easily convey. Use the same full demonstration throughout this section, then revisit short extracts with explanation. Avoid introducing several different sequences before students can remember the first one.

Activity Time What to do
Lessons 7.1–7.3 15 minutes Learn the route, opening and transitions
Full real-time demonstration 30 minutes Watch without trying to copy simultaneously
Lessons 7.4–7.7 and replay 20 minutes Examine pace, check-ins, decisions and closing
Three continuity drills 15 minutes Rehearse the difficult connections
Partner practice 30 minutes Complete the beginner sequence when ready
Feedback and learning check 15 minutes Reflect, answer and select one improvement

Suggested total: 125 minutes, divided over more than one sitting if helpful. Demonstration and lesson timings are production plans; videos have not been supplied or filmed in this package. The 60-minute progression is optional later practice.

A useful way to watch

First viewing: notice the overall order and how little needs to change at once. Second viewing: watch the supporting hand and how contact ends. Third viewing: identify where Ruth checks comfort, repeats a familiar movement, or changes pace. Pause between viewings to recall the sequence without looking.

Observation prompt: Where does the session feel continuous even though the hands change position?

My first observation: __________________________________________________

Lessons

Lesson 7.1 · Learn one dependable route

Outcome: recall the sequence before memorizing timings. Suggested teaching time: 5 minutes.

Teaching script

“When you first begin, an entire session can sound like a lot to remember. Give yourself a route you can return to. Agree on the plan, open the session, work through the first foot, change sides, repeat the familiar pattern, and close.

“You do not need a new movement every minute. Familiar techniques can be repeated with attention. You are noticing whether the contact remains comfortable, whether your support is steady, and whether you are moving at a pace you can sustain.

“For this learning sequence, begin with the client’s right foot, then the left. That starting side is a memory aid, not a therapeutic rule. If the agreed plan calls for a different side, say so and adjust your card before beginning.”

The foundational order

Agree → opening contact → right-foot block → supported change → left-foot block → closing contact → release and feedback.

Within each foot block use the same five functions: settle → sole pass → ball and toe-pad pass → heel cradle → return and release. The technique key below defines this proposed beginner sequence. The shorthand A means sole pass; B means ball and toe-pad pass. These are gentle contact patterns for learning continuity, not an organ-treatment sequence.

For a nine-minute foot block, use 1 minute settling, 3 minutes of A, 3 minutes of B, 1 minute of an agreed hold, and 1 minute returning to the closing contact. These are block budgets that include repositioning and check-ins. They do not prescribe three minutes on one point or an uninterrupted one-minute pressure hold. Move, release and vary location only as the learned technique requires.

Keep the repertoire small: two familiar movements and a hold are enough to practise sequencing. Do not add tools, new points, stretches, joint movements or stronger pressure to make the session feel more advanced.

Try now: cover the sequence and say its seven stages. Then name the five functions within each foot block.

Practice & reference

Technique key for this proposed sequence

An original teaching choice: these gentle, broad contacts help students learn flow. They do not represent a complete organ-map reflexology protocol. General foot-care guidance describes gentle circular and sweeping massage, but the order and timing here are curriculum choices. [3]

Use a consenting adult partner who has passed the course’s screening process. Do not practise over broken or irritated skin, an injured area, unexplained swelling or pain. Altered sensation or a condition affecting circulation or healing needs the Section 2 suitability decision before practice. Choose a model if the situation is uncertain. No tools, joint manipulation, deep pressure or pressure to the neck is included.

Opening and settling

Rest the lower leg and heel securely on a padded support with the ankle in a comfortable resting position. Do not force the ankle to point or flex. After permission, gently cup the sides of the heel with relaxed hands, or use the demonstrated equivalent that leaves the limb supported. Contact is broad and comfortable, not a squeeze. Check comfort before adding movement. Work one foot at a time; there is no need to lift both feet.

A The sole pass

Keep the heel and lower leg supported. One hand steadies the foot without clamping. With the soft pads of the other hand, make gentle broad contact along the sole: heel pad, arch area, then the ball behind the toes. Use short smooth strokes or small comfortable circles without digging a thumb into a point. Release before moving to the next area. Return lightly and repeat the route if welcome. Keep the skin from dragging; if a stroke catches, lift and reposition rather than pulling it. The heel-to-ball order is a memory aid, not a claim about circulation or organ pathways.

B The ball and toe pad pass

With the foot still supported, use soft finger pads for gentle contact across the padded ball, from the big-toe side toward the little-toe side. Then touch the fleshy pad of each toe in order, big toe to little toe, with light contact and a release between toes. Avoid nails, web spaces and painful or irritated areas. Do not pull, twist, crack or bend the toes. Repeat only if comfortable; toes may be omitted entirely. If contact is ticklish, pause and ask rather than automatically increasing pressure.

The heel cradle

Return to broad contact around the sides and underside of the heel while its weight remains supported. Rest your hands rather than pressing into the heel or Achilles tendon. Release or reposition whenever needed. The one-minute budget includes arriving, a comfortable pause, checking if needed and leaving; it does not require an uninterrupted pressure hold. This is the beginner version of a hold, not an instruction to copy an advanced compressive hold.

Return and closing

Repeat a short comfortable sole pass, return to broad contact and release gently. In the four-minute overall closing phase, give roughly two minutes to each foot using this familiar pass-and-cradle pattern, with less movement if preferred. Support each foot before changing sides, then leave both resting comfortably. No particular sensation or state is required.

Demonstrate before students copy: show support, the contacting surface of the hand, a complete release and a comfort-led adaptation in close view. Keep the first attempt brief and instructor-observed. Pressure is guided by individual feedback, not by a numerical target or a “good pain” threshold.


Practice & reference

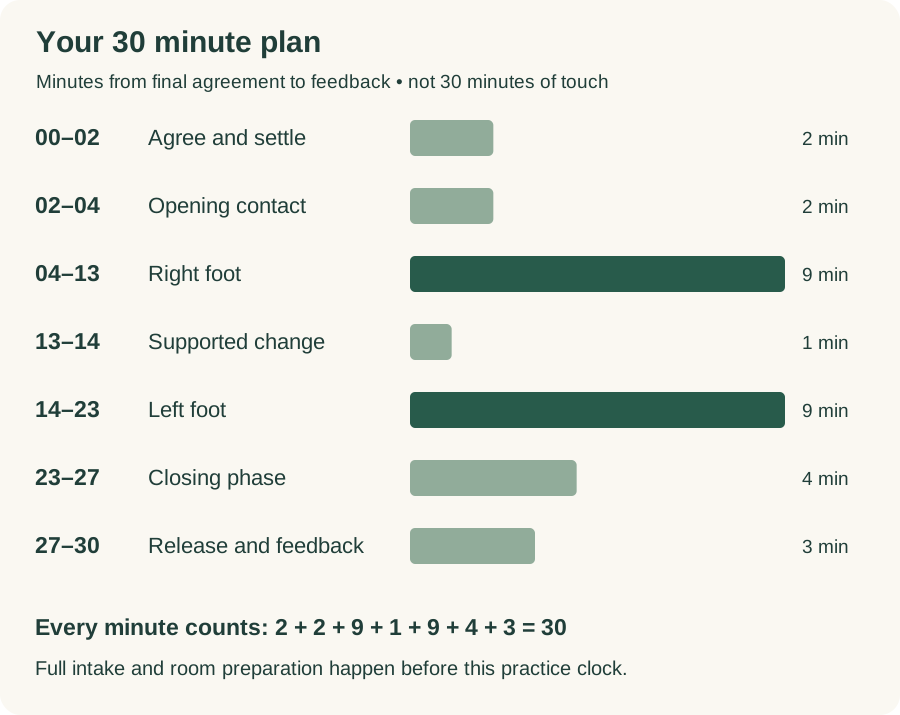
The 30 minute beginner session

Timing convention: these are 30 minutes from final agreement through feedback, including transitions. Complete the fuller intake, safety screening and room preparation beforehand. Explain separately how a paid appointment’s total length and hands-on time are defined.

Clock Minutes Stage Your job
00:00–02:00 2 Agree and settle Confirm areas, comfort, stop signal and readiness
02:00–04:00 2 Opening contact Use learned opening contact; check first pressure
04:00–13:00 9 Right foot Settle 1, movement A 3, movement B 3, hold 1, return 1
13:00–14:00 1 Change sides Finish, support, announce change and reposition
14:00–23:00 9 Left foot Repeat the five-part pattern with comparable pacing
23:00–27:00 4 Closing phase Familiar finishing contact and comfortable pauses
27:00–30:00 3 Release and feedback End touch, allow time, check comfort and listen

Thirty minute timeline with seven stages and paired nine minute foot blocks

Timing is a guide, not an instruction to continue touch. Pause or stop whenever needed. If you spend extra time adjusting supports, shorten a later optional repetition. Never rush the second foot or the ending to make up time. An interrupted practice can end safely before all stages are completed.

At minute 23: begin closing even if you had imagined another repetition. Practise finishing deliberately.

Lessons

Lesson 7.2 · Open clearly and comfortably

Outcome: begin without surprising the person. Suggested teaching time: 5 minutes.

Teaching script

“Before I begin, I want us to agree on what today includes. We are practising a 30-minute feet-only sequence. You can ask for a change, a pause, or an end at any time. We will use the stop signal we chose earlier.

“Are your feet and legs supported comfortably? Is there anything you would like changed before I touch your feet? Is it okay to begin now?”

Wait for a clear response. Use the opening contact taught in Section 6. Keep the foot supported and introduce contact predictably. After initial contact and the first pressure application, ask: “Would you prefer less pressure, the same, or a pause?” Give time for an answer and act on it.

Make the question answerable: “Everything okay?” can be difficult to respond to. Concrete choices make adjustment easier. Agree on an accessible signal if speech is not the best option. Silence is not permission for new contact.

Short demonstration A

Film a 90-second opening: final agreement, positioning check, permission, learned contact, first pressure check, and one small requested adjustment. Show the adjustment at normal speed. Keep both hands and the support visible.

Watch for: the practitioner waits for the answer; the foot is supported; the first touch is not abrupt; the response produces a visible change.

Practice prompt

With no pressure technique, rehearse the opening conversation twice. On the second round, the partner asks for a different support or declines contact. The goal is a clear response, not getting the person to agree.

My opening words: __________________________________________________

Lessons

Lesson 7.3 · Make transitions easy to follow

Outcome: connect techniques and change sides without abruptness. Suggested teaching time: 5 minutes.

Teaching script

“Continuity does not mean your hands must stay on the person every second. It means the next step makes sense and the person remains supported. Sometimes the best transition is to stop, explain what you are changing, and begin again with permission.

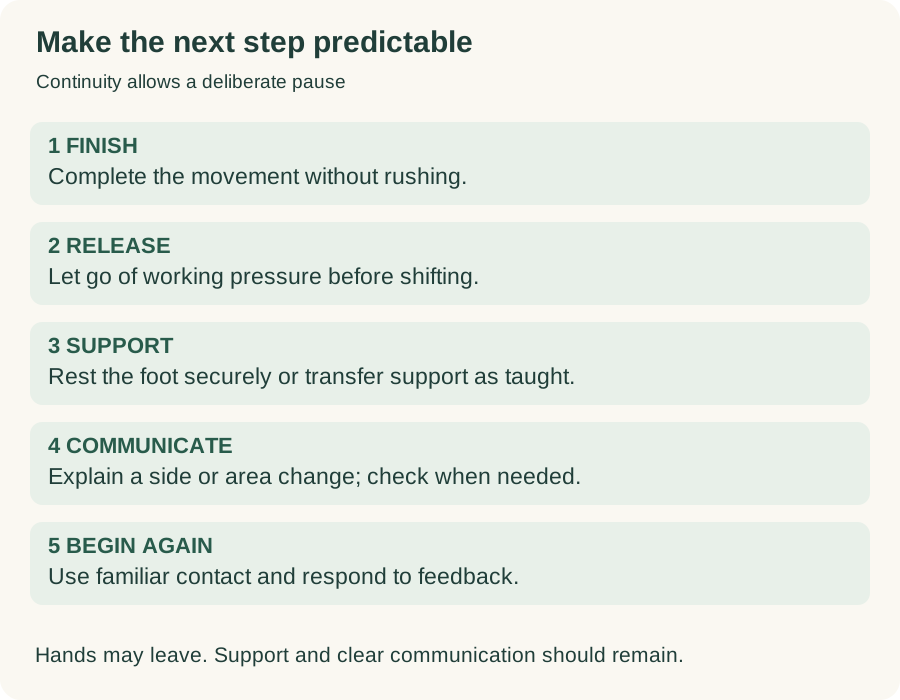
“At the end of a movement, release its pressure before changing your hand position. Use the support method you have learned. Place the next supporting hand before removing the previous one when that is appropriate to the technique. If both hands must leave, settle the foot onto its support first.

“When changing feet, finish the phrase you are doing. Let the first foot rest securely. Tell the person you are changing sides, reposition yourself, and begin the other foot with the same care as the first.”

Transition guide showing finish, release pressure, secure support, communicate and begin again

Short demonstration B

Film two 45-second examples on a model: an abrupt unsupported switch and a supported, communicated switch. Label the first as an error simulation. Then show one good change between learned movements on a consenting partner. Do not demonstrate dropping or wrenching a real person’s foot for contrast.

Pause and predict: just before the working hand changes, stop the teaching replay. Ask: “What supports the foot next?” Resume to show the answer.

If you lose your place

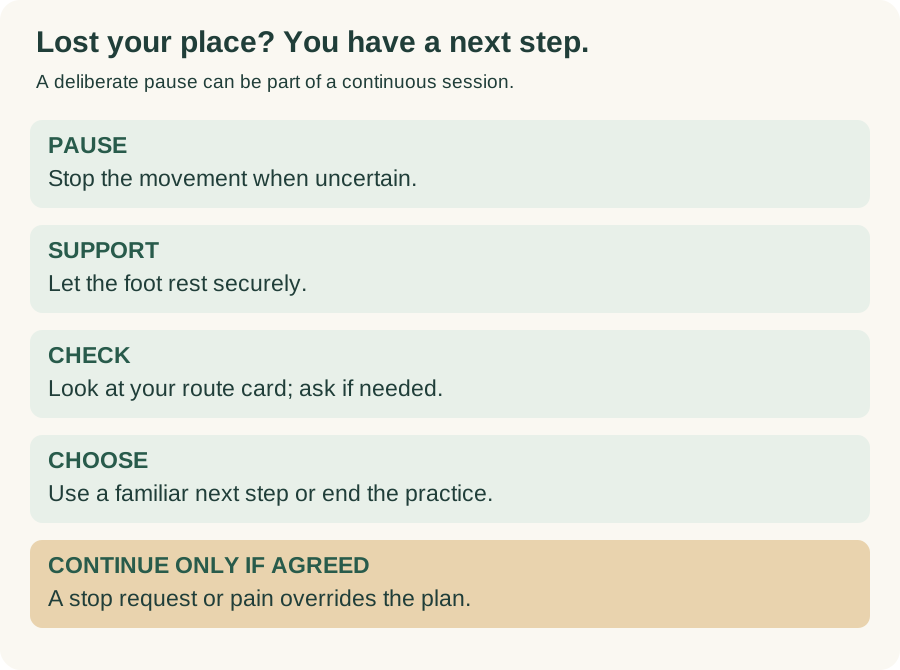
Stop the movement. Maintain only comfortable, consented support, or rest the foot safely. Look at the route card. Resume at the next familiar stage; do not restart the whole sequence. Say, “I’m taking a moment to reposition.” If you need instruction, end the practice movement and consult the teacher.

Lessons

Lesson 7.4 · Pace without trying to fill time

Outcome: vary rhythm intentionally and match comparable work. Suggested teaching time: 5 minutes.

Ruth’s approach

Ruth describes beginning at a familiar massage-like rhythm and gradually slowing. She sometimes increases or decreases pace during a session, while matching the pace of the same sequence on the other foot. She also describes holds and heel contact that clients may find pleasant.

Teaching script

“Start at a comfortable, unhurried rhythm you can control. Let the person tell you how that feels. As the session develops, you can make the movement more spacious if that suits them. Slower is an option, not a contest.

“When you repeat the same sequence on the other foot, remember its character. If it was a quiet, slow phrase, give the other foot that same attention. Match the intention and approximate duration, while adapting pressure and contact to the actual foot and the person’s feedback.

“You do not need stronger pressure to use more time. Revisit a familiar comfortable movement, release regularly as taught, or use an agreed restful pause. If you are uncertain what to do, return to the plan.”

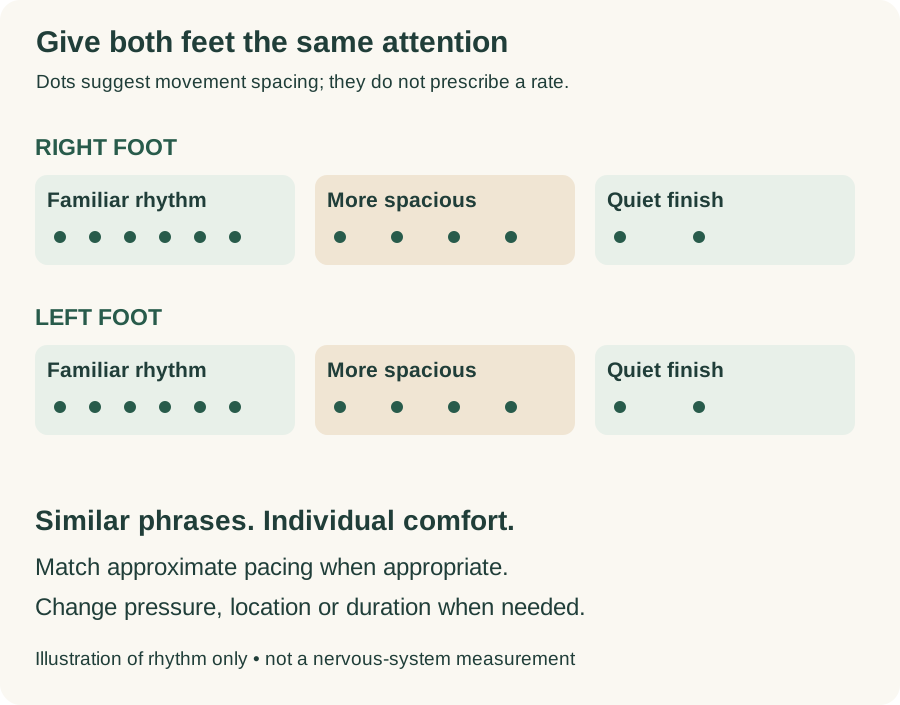
Paired pacing phrases showing a familiar rhythm, more spacious movement and a quiet finish on each foot

What the picture means

This is a teaching illustration of rhythm, not a graph of nervous-system activity. There is no evidence-based ideal speed or fixed hold duration established here. Feeling relaxed, closing the eyes or breathing differently does not establish a particular brainwave state or a specific nervous-system mechanism. Reflexology’s proposed effects in body areas corresponding to foot points are not proven. [1]

Comfort overrides symmetry: if one foot needs less pressure, a shorter block or an omitted area, adapt. Never repeat discomfort to make the sides match.

Lessons

Lesson 7.5 · Use check ins that protect the session

Outcome: ask briefly, respond visibly and check again. Suggested teaching time: 4 minutes.

When to ask

  • Before the first contact and after the first pressure application.
  • When pressure, technique, area or positioning changes meaningfully.
  • When you notice withdrawal, bracing, a changed expression or another uncertain cue.
  • Before adding head or scalp contact, even if feet contact was already agreed.
  • Near the ending and after release.

Routine comfortable repetition does not need constant narration. Equally, a quiet atmosphere is never a reason to ignore uncertainty. There is no compulsory “every five minutes” rule.

Words to practise

“Would you prefer less pressure, the same, or a pause?”

“I noticed you moved your foot away. Would you like me to stop?” Stop the movement while asking.

“I have reduced the pressure. How is that now?”

“We can leave this area out. Would you like to continue elsewhere, or finish?”

The response matters more than the wording

If a person says stop, stop the technique immediately. Help the foot rest safely without prolonging unwanted touch. If they describe pain, stop that technique; do not work through it or interpret it as a useful release. New or unexplained symptoms call for the Section 2 screening and referral process, not a new reflex point or more pressure. General manual-therapy safety guidance also advises against delaying medical care. [2]

Short demonstration C: a consenting actor withdraws a foot as a pre-agreed cue. Show noticing, stopping, asking, adjusting if wanted, and checking again. Do not label the actor’s inner state.

Quick check: eyes closed and no answer to a new-area question means no new permission. Stay within existing consent, and pause if comfort or consent is uncertain.

Lessons

Lesson 7.6 · Close the session with care

Outcome: finish without an abrupt last touch or a hurried departure. Suggested teaching time: 4 minutes.

Teaching script

“We are coming toward the end. I’ll finish with the closing contact we agreed on, then let your feet rest.”

Use familiar finishing movements and comfortable contact during minutes 23–27. This four-minute phase is a small sequence, not a requirement to hold pressure continuously for four minutes. Avoid introducing a new stimulating technique at the last moment.

Release pressure, rest the feet securely, and end touch clearly. Say: “The hands-on part is finished. Take your time. How are you feeling?” Allow an unhurried return to sitting or standing within your training and the setup’s safe use. If the person feels unwell, pause and follow the relevant safety procedure rather than urging them to leave.

Ask for useful feedback

“Was there any contact you would want changed next time?” is more useful than “Wasn’t that relaxing?” The first invites information. The second suggests a preferred answer.

A person may report calm, no noticeable change, distraction or discomfort. Listen without turning the response into a diagnosis. Do not promise a detox response, prescribe extra water to flush toxins, or explain later symptoms as proof that reflexology worked.

Short demonstration D

Film 90 seconds showing the final contact, release, feet resting, a clear end-of-touch statement and an open feedback question. Include a neutral response such as “I don’t notice much difference.” Model: “Thank you for telling me. Was the contact comfortable?”

Your closing sentence: __________________________________________________

Lessons

Lesson 7.7 · Make simple choices within the structure

Outcome: keep the route stable while adapting appropriately. Suggested teaching and replay time: 7 minutes.

Keep consistent while learning Simple choices you can make
Final agreement, opening, foot blocks, closing and feedback Feet only, or an agreed feet-and-head plan after separate head-work training
The same learned A and B movements and order on both sides A modest change in pace or repetition when comfortable
Safe support and controlled release between movements Support position suited to the person and your working posture
A comparable intention and rhythm on each foot Less pressure, shorter contact or omission on either side
A reserved ending rather than a last-minute scramble Quiet or brief conversation according to preference
Acting on a stop signal immediately Ending early whenever the person chooses

Avoid early complexity: keep tools, multiple competing routes and new pressure methods out of the first full practice. Learn to connect the techniques you already have.

A decision you can see on replay

At a transition, ask students to identify what actually changed: hand position, support, rhythm, pressure, location, or spoken agreement. Then ask what evidence justified it. “The client asked for less” is evidence. “Their nervous system needed this point” is an interpretation the video cannot establish.

Retrieval challenge: without looking, name two things you keep consistent and two things you would change for comfort.

Production & sources

Complete real time demonstration production script

Video to film: one continuous 30-minute feet-only example using the beginner plan. This is a recording script, not a finished video or evidence that the physical sequence has been demonstrated.

Before recording

Use the proposed opening, sole pass, ball and toe-pad pass, heel cradle and closing defined in the technique key. Rehearse them before filming and align the Section 6 demonstrations with these names so students see the same method in both sections. Complete screening, separate recording consent and positioning beforehand; no private intake information needs to appear on camera. Explain that filming can stop at any time.

Keep a wide view showing support, both feet and Ruth’s working position, plus a synchronized close view of the hands. Use the client’s right and left labels and never mirror footage. Record natural interaction. Ruth does not need to narrate every movement; retain consent and comfort questions. Use a quiet elapsed-time display and brief phase labels, with captions for audible speech.

Elapsed time Action on screen Label or essential speech
00:00–02:00 Final agreement and readiness “Feet only today. Is it okay to begin?” Retain the actual response
02:00–04:00 Learned opening contact and pressure check Opening • “Less pressure, the same, or a pause?”
04:00–05:00 Settle right foot into supported contact Right foot • Settle
05:00–08:00 Sole pass with releases and repositioning Right foot • Sole pass
08:00–11:00 Ball and toe-pad pass with releases and repositioning Right foot • Ball and toes
11:00–12:00 Comfortable hold block with adjustment or release as needed Right foot • Hold
12:00–13:00 Return to familiar finishing contact Right foot • Return
13:00–14:00 Supported change and practitioner repositioning “I’m changing to your other foot.”
14:00–15:00 Settle left foot Left foot • Settle
15:00–18:00 Sole pass with comparable pacing Left foot • Sole pass
18:00–21:00 Ball and toe-pad pass with comparable pacing Left foot • Ball and toes
21:00–22:00 Comfortable hold block; adapt if needed Left foot • Hold
22:00–23:00 Return to familiar finishing contact Left foot • Return
23:00–27:00 Familiar closing sequence and comfortable pauses “We are coming toward the end.”
27:00–30:00 Release, rest, unhurried return and feedback “The hands-on part is finished. How are you feeling?”

Authenticity rule: do not speed up, loop footage, remove check-ins or conceal interruptions to make a session appear continuous. If safety or comfort interrupts the take, stop appropriately. Keep it as an adaptation teaching example or film a new complete take. When combining synchronized angles, preserve elapsed time.

Practice & reference

Replay the decisions that are easy to miss

After the uninterrupted viewing, use an annotated replay of about 5 minutes within Lesson 7.7. The times below refer to the planned full recording; adjust markers to the actual footage. Do not put all this commentary over the first viewing.

Replay marker Pause and notice Explanation to add
02:00 The moment before contact Agreement comes before beginning; an answer is allowed time
05:00 Support as movement A starts Identify which hand or surface carries the foot; movement and support have different jobs
08:00 A changes to B Pressure is released before repositioning; the new movement begins without haste
11:00 Movement becomes a hold Stillness is a chosen phase, not forgotten work or a demand to tolerate pressure
13:00 The change of foot The first foot rests securely before attention shifts
15:00 and 05:00 Compare A on both feet Look for similar rhythm; explain any comfort-led difference
Actual check-in time A question changes the action Name the reported preference and the visible adjustment
23:00 The closing begins Time has been reserved; the practitioner does not squeeze in an extra technique
27:00 The hands leave The client hears that touch has ended and has time to respond

Sound off then sound on

Watch 20 seconds with the sound off and describe only what you see. Replay with sound. What did the client’s words clarify? If no preference change occurs naturally in the complete demonstration, film a separate, clearly labeled simulation rather than inventing an explanation for an ordinary movement.

Accessible companion: provide captions and a descriptive transcript naming the working side, the learned movement, support changes and essential client interaction. Learners who cannot follow a close visual view need more than silent hand footage.

One subtle decision I can now explain: __________________________________________________

Practice & reference

Add head time without losing the plan

Ruth reports that many women in her practice choose some head time. Treat this as her experience, not a prediction about an individual. Ask each client what they prefer, regardless of gender. Feet-only remains a complete option.

Prerequisite: separate instruction and competence in the agreed head or scalp techniques. Do not assume foot training authorizes new head, face or neck methods. This section supplies time allocation and communication, not head-work mechanics.

Clock 30-minute mixed practice Minutes
00:00–02:00 Final agreement and settle 2
02:00–03:00 Learned foot opening 1
03:00–09:00 First foot block 6
09:00–10:00 Supported side change 1
10:00–16:00 Second foot block 6
16:00–18:00 Finish feet, secure support, clean hands and reposition 2
18:00–28:00 Previously learned, consented head sequence including its own opening and closing 10
28:00–30:00 End touch, rest and feedback 2

For each six-minute foot block: settle 30 seconds, A 2 minutes, B 2 minutes, hold block 1 minute, return 30 seconds. These remain flexible budgets, not mandatory pressure durations. The foot portion and its transitions occupy 16 minutes, with 10 minutes for head work and 4 minutes for agreement and final feedback.

The original timing slip: 10 minutes on the head plus 30 minutes on the feet is 40 minutes before other appointment tasks. If you advertise 20 minutes of foot contact plus 10 minutes of head contact, allow additional appointment time for discussion, hygiene, transitions and settling. The table above instead fits the entire learning sequence into 30 minutes.

Transition words: “The foot portion is finished. I’ll clean my hands and reposition. Would you still like the head work we discussed?” Obtain the answer before beginning the new area. Allow the hygiene and setup time actually needed; shorten optional work or revise the agreed finish if it takes longer than the budget.

If head work is declined, use the feet-only plan from the outset. If the preference changes mid-session, pause and agree on remaining time rather than silently adding more foot work.

Practice & reference

Grow into a 60 minute feet only session

Do this after you can complete the short session comfortably and respond to feedback. More time does not require more force, a larger repertoire or continuous pressure on one location.

Clock Minutes Stage
00:00–03:00 3 Final agreement and settle
03:00–07:00 4 Opening contact and comfort check
07:00–27:00 20 First foot block
27:00–29:00 2 Supported side change
29:00–49:00 20 Second foot block
49:00–56:00 7 Closing sequence with comfortable pauses
56:00–60:00 4 Release, rest and feedback

Within each 20-minute foot block: settle 2 minutes, first A-and-B pass 6 minutes, repeated A-and-B pass 6 minutes, comfortable hold-and-release phase 3 minutes, familiar return phase 3 minutes. In each six-minute pass, allow roughly three minutes for A and three for B, including normal releases and repositioning. The second pass can be more spacious if the person prefers. The three-minute hold-and-release phase contains brief contacts and releases as taught, not one prolonged pressure hold.

When an hour feels too long

Work on the 30-minute sequence again. Review where you rushed. Rehearse a longer foot block with an instructor before offering an hour. A beginner does not have to offer every appointment length immediately.

When the client asks for a different pace

Ask what change they would prefer and adapt within the techniques you know. Ruth’s gradual slowing is a practice preference, not a requirement that the person become quieter or sleepier. If sustained contact is unwelcome, more minutes are not the solution.

Planning challenge: you spend three extra minutes on positioning. Name an optional repeat you could shorten and explain how you will keep the second foot and the ending unhurried.

Practice & reference

Three drills for continuity

Use a model if you have not completed technique instruction. For partner work, agree on the drill and stop signal first. Each drill lasts five minutes including feedback.

Drill 1 The support hand

Practise a learned contact, release its pressure, change to the next learned contact, and settle the foot. Repeat slowly. The observer watches support rather than the moving fingers. Spend three minutes rehearsing and two minutes discussing what felt secure or abrupt.

Success cue: the foot stays supported without squeezing to keep control. If the transition cannot be performed comfortably, simplify and ask for instruction.

Drill 2 The paired phrase

Perform a short familiar phrase on one foot and then the other. Ask the partner whether the two versions felt comparably paced, and whether either needs a change. Use two minutes per side and one minute for feedback. Comparable pace does not require identical pressure.

Success cue: you can repeat the character of the phrase without ignoring differences in comfort.

Drill 3 The planned interruption

During a short practice, the observer says “You’ve lost your place.” Stop the movement, secure support, consult the route card and resume a familiar stage. On the second attempt, the partner says “stop.” End the technique immediately rather than finishing the phrase. Debrief within the five-minute drill.

Success cue: the learner can pause without apologizing repeatedly, speeding up, inventing a technique or restarting from the beginning.

Recovery card showing pause, support, check, choose and continue only if agreed

Remember: a deliberate pause can preserve continuity. Continuing automatically through uncertainty cannot.

Practice & reference

Workbook Plan your practice

Use a practice code rather than identifying or medical details if this sheet will be shared with classmates. This browser workbook does not automatically save your entries; use Print to keep a copy.

Practice code and date: __________________________________________________

My chosen plan and total time: __________________________________________________

My learned opening technique and Section 6 reference: __________________________________________________

Movement A and the demonstrated version I will use: __________________________________________________

Movement B and the demonstrated version I will use: __________________________________________________

My learned hold and closing contact: __________________________________________________

Starting side and agreed areas or omissions: __________________________________________________

Comfort preferences and agreed stop signal: __________________________________________________

The clock time when I will begin closing: __________________________________________________

The optional repetition I can shorten if needed: __________________________________________________

Before beginning

  • I have completed the relevant safety and technique preparation.
  • The partner understands the exercise and has agreed to participate.
  • I checked support, positioning and my own working posture.
  • I can name each movement on my card and know its release method.
  • I have a clear plan for ending and obtaining feedback.

Practice & reference

Workbook Observe and reflect

During the session

An observer can use this sheet without interrupting every movement. Intervene immediately for an ignored stop signal, pain or unsafe support. Otherwise save ordinary feedback until the end.

Checkpoint Note what happened
Opening agreement and first comfort check Record the words and the response
Transition between A and B Note support and pressure release
Side change Note whether the first foot was secure
Comparable work on the second foot Note pace and any explained adaptation
Closing start Record the actual elapsed time
Ending Note clear release and unhurried feedback

Where I lost my place or confidence: __________________________________________________

What I did next and how the partner responded: __________________________________________________

Partner’s words about comfort or preference: __________________________________________________

What I observed without interpreting it: __________________________________________________

One assumption I avoided making: __________________________________________________

One thing to repeat and one thing to improve next time: __________________________________________________

Feedback language

Use “When you changed feet, the first foot stayed supported” instead of “You have healing hands.” Use “I preferred the lighter contact” instead of guessing what the practitioner did to an organ or the nervous system.

Practice & reference

Learning check

Answer before opening the answer key. These are learning scenarios, not accounts of Ruth’s clients.

  1. Put these in order: closing, first foot, agreement, second foot, opening, feedback, side change.

  2. How many minutes does the beginner plan reserve for each main foot block? What happens at minute 23?

  3. Your 30-minute plan contains 10 minutes of head work and 30 minutes of foot work. What must change?

  4. You finish movement A and need to reposition both hands. What must be secure first?

  5. You worked slowly on the first foot. Must you use exactly the same pressure on the second?

  6. Your partner closes their eyes. What does that tell you about their brainwave state?

  7. You forget the next movement. What can you do without inventing a technique?

  8. Your partner says a hold hurts. Should you maintain it more gently until your timer ends?

  9. You have permission for foot work. Can you move to the head without asking because the session is nearly over?

  10. You have six minutes left and want another long repetition. What takes priority?

  11. How can you extend a familiar sequence without increasing pressure or adding new techniques?

  12. What makes an uninterrupted real-time video different from a highlight montage?

My answers: __________________________________________________

Practice & reference

Answer key and practical assessment

Answer key

  1. Agreement → opening → first foot → side change → second foot → closing → feedback.

  2. Nine minutes per foot block; begin the closing phase at minute 23.

  3. The contact alone totals 40 minutes. Choose a shorter allocation that includes transitions, or agree on a longer appointment. The supplied mixed plan keeps head work at 10 minutes and accounts for all 30 minutes.

  4. Release working pressure and make sure the foot rests securely on an appropriate support before both hands leave.

  5. No. Match the approximate pace and intention when appropriate; adapt pressure, areas and duration to comfort.

  6. It shows that their eyes are closed. It does not establish a particular brainwave or nervous-system state.

  7. Stop movement, secure support, check the route card and resume a familiar stage if agreed. Seek instruction if you do not know the technique.

  8. No. Stop that technique immediately and check what the person needs. A timer never overrides pain or withdrawal of consent.

  9. No. New-area contact needs agreement and appropriate prior training.

  10. Preserve an unhurried close. Omit the optional repetition.

  11. Repeat a familiar comfortable pass, use appropriate releases and agreed pauses, and adjust pace if wanted. Do not prolong pressure to fill a clock.

  12. Real-time footage preserves actual elapsed time, including transitions and check-ins. A montage selects or compresses moments and cannot establish continuity.

Practical assessment

An instructor or competent assessor observes a complete practice. Suggested ratings: ready for further practice, repeat with coaching, or not yet demonstrated. These are course-development criteria, not licensing or certification standards.

Skill Evidence to observe
Consent and response Clear agreement, usable stop signal and prompt response to requests
Technique readiness Only learned techniques; comfortable support and controlled release
Sequence Identifiable beginning, paired foot blocks, closing and feedback
Transitions Support maintained or deliberately restored before changing
Pacing Unhurried work; comparable phrases with comfort-led differences
Check-ins Relevant questions followed by actual adjustment when requested
Recovery and timing Safe pause when uncertain; optional work shortened before closing is rushed
Reflection Specific observations, client wording and one practical next step

Do not mark the practice ready if the learner ignores a stop request, continues painful contact or uses an unlearned method. Stop and coach that issue before repeating. A smooth-looking video or a high quiz score does not replace observed hands-on competence.

Production & sources

Instructor production notes and sources

What came from Ruth

Repeated visual demonstration; 30- and 60-minute session options; some clients choosing head time; beginning at a familiar rhythm and gradually slowing; varying pace while matching the same sequence between feet; and the value she places on comfortable holds. These are her reported practice preferences.

What was added for teaching

At the user’s request to choose a sequence, the supported opening, sole pass, ball and toe-pad pass, heel cradle and finishing contacts were selected as an original teaching proposal. The right-first memory aid, exact time budgets, consent wording, four short demonstration briefs, replay markers, workbook, drills and rubric are also proposed additions. The 10-plus-30-minute arithmetic was corrected explicitly. The proposed model does not claim to be a standardized clinical protocol.

Technique integration before student release

The user authorized the course writer to choose the beginner sequence. The technique key therefore gives a concrete proposed answer rather than leaving unnamed movement slots. It is not a reconstruction of Ruth’s undocumented personal method, and it is not a validated therapeutic protocol.

Align Section 6 with these contact names or replace them consistently after Ruth demonstrates her preferred equivalent. Rehearse the chosen contacts, support and releases on camera and verify that the timing is workable. Student hands-on competence still requires observation and feedback; written directions alone cannot establish it.

Claims and sources

[1] NCCIH — Reflexology. Supports the evidence boundary: proposed effects in body areas corresponding to foot points have not been proven. It does not validate this sequence, the teaching timings, a universal slowing effect, or particular nervous-system holds. Read the source.

[2] NCCIH — Massage Therapy What You Need To Know. General manual-therapy safety context, including rare serious harms and the importance of not postponing medical care. This is broader massage guidance, not evidence that reflexology and massage are interchangeable or that every technique is appropriate for every person. Read the source.

[3] Torbay and South Devon NHS Foundation Trust — Foot Care for Carers. Provides a general example of gentle circular and sweeping foot massage. It does not prescribe the sequence here or establish reflex-point effects. The leaflet’s printed review date is July 2024, so it is used only as background, alongside current safety guidance. Read the leaflet.

Sources checked September 24, 2026. Section 2 supplies this course’s consent and screening framework; Section 4 explains observation versus interpretation; Section 5 supplies setup and hygiene preparation. Timing diagrams are original teaching aids, not research graphs or anatomical treatment maps.

Filming deliverables

  • One continuous 30-minute beginner demonstration with natural check-ins.
  • Four short clips: opening, transitions, responding to feedback, and closing.
  • One annotated replay with verified timestamps and a descriptive transcript.
  • A separately labeled head-work option after technique instruction is available.
  • An optional full 60-minute example after the short sequence is established.

Production status: written teaching package and original visual aids prepared; instructor technique review and rehearsal, hands-on assessment and video recording remain. Do not label the course as filmed or the physical sequence as validated on the strength of this document.

A note for this section

Review workspace

Where your comments live

Connect to the website to share notes with each other. On a static host, use this browser and export your comments to share them.

The access code is in the separate upload guide. Everyone with it can read, edit and resolve review notes.


Device comments are kept in this browser, not sent to anyone. Export a backup before clearing browser data or switching devices.